241 TallyPrime Shortcut Keys Demystified + 32 Productivity Hacks (with Download PDF option)
We all know that shortcut keys in any software help you expedite your work and optimize your delivery time. Tally Solutions has always prioritized the importance of the shortcut keys and has been continuously working on adding shortcut keys in all previous versions of Tally. In this Mastering TallyPrime Series, we will present a comprehensive list of over 230+ TallyPrime Shortcut keys with 30+ productivity hacks to bring efficiency and save you valuable time executing your job.
TallyPrime introduces these new shortcut keys without replacing or eliminating the existing shortcut keys from Tally ERP 9, ensuring its users use the latest version with no difficulty.
Previously we have written about the most utilized shortcuts in TALLY ERP 9. We hope that our students found it beneficial for their practice. Now we are on track to compiling all the TallyPrime Shortcut Keys under one post. A downloadable copy of the same will be available to you soon.
So, Here we go.
Table of Contents
- Common Keyboard Shortcuts found throughout TallyPrime (Total 49)
- Tallyprime shortcut keys to work on Reports (Total 31)
- Shortcuts use in Vouchers & Masters (Total 25)
- Keyboard Shortcuts to Open Vouchers (Total 17)
- Editor keys and Menu keys used in TallyPrime Developer (Total 119)
- Most Important TallyPrime Shortcut Keys for regular use (Total 32)
- Download PDF

Common Keyboard Shortcuts found throughout TallyPrime (Total 49)
| # | Function/Action | Keyboard Shortcuts | Where should you find? |
|---|---|---|---|
| 1 | To navigate to the previous screen and closing the currently open screen
To clear the provided/selected inputs for a field |
Esc | – |
| 2 | To go to the first/last menu in a section | Ctrl + Up/Down | – |
| 3 | To go to the left-most/right-most drop-down top menu | Ctrl + Left/Right | – |
| 4 | To go from any line to the first line in a list | Home & Page Up | – |
| 5 | To go from any point in a field to the beginning of the text in that field | Home | – |
| 6 | To go from any line to the last line in a list | End & Page Down | – |
| 7 | To go from any point in a field to the end of the text in that field | End | – |
| 8 | To navigate one line up in a list
To navigate to the previous field |
Up arrow | – |
| 9 | To navigate one line down in a list
To navigate to the next field |
Down arrow | – |
| 10 | To navigate:
* One point left in a text field * To the previous column on the left * To the previous menu on the left |
Left arrow | – |
| 11 | To navigate:
* One position right in a text field * To the next column on the right * To the next menu on the right |
Right arrow | – |
| 12 | To rewrite data | Ctrl + Alt + R | – |
| 13 | To close the program | Alt + F4 | – |
| 14 | To examine the build data | Ctrl + Alt + B | – |
| 15 | To examine TDL/Add-on information | Ctrl + Alt + T | – |
| 16 | To increment the Report date or navigate to next report in a sequence of generated reports | ” + “ | – |
| 17 | To decrement the Report date or navigate to previous report in a sequence of generated reports | “–” | – |
| 18 | To save a screen | Ctrl + A | – |
| 19 | To expand or collapse a group in a table | Alt + Enter | – |
| 20 | To go to the last field or last line | Ctrl + End | – |
| 21 | To go to the first field or first line | Ctrl + Home | – |
| 22 | To open or hide calculator panel | Ctrl + N | – |
| 23 | To hide or show the details in a table | Alt + T | – |
| 24 | To open Company Features screen | F11 | Top menu |
| 25 | To primarily open a report, and create masters and vouchers in the flow of work. | Alt + G | Top menu |
| 26 | To navigate to a different report, and create masters and vouchers in the flow of work. | Ctrl + G | Top menu |
| 27 | To open Company top menu | Alt + K | Top menu |
| 28 | To open TallyHelp topic based on the context of the screen that is open | Ctrl + F1 | Top menu |
| 29 | To open the company menu with the list of actions related to ma-ging your company | Alt + K | Top menu |
| 30 | To open the list of actions applicable to ma-ging the company data | Alt + Y | Top menu |
| 31 | To open the list of actions applicable to sharing or exchanging your company data | Alt + Z | Top menu |
| 32 | To open the import menu for importing masters, transaction, and bank statements | Alt + O | Top menu |
| 33 | To open the e-mail menu for sending transactions or reports | Alt + M | Top menu |
| 34 | To open the print menu for printing transactions or reports. | Alt + P | Top menu |
| 35 | To open the export menu for exporting masters, transactions, or reports | Alt + E | Top menu |
| 36 | To choose the display language that is applicable across all screens | Ctrl + K | Top menu |
| 37 | To choose the data entry language that is applicable to all screens | Ctrl + W | Top menu |
| 38 | To export the current voucher or report | Ctrl + E | Top menu |
| 39 | To e-mail the current voucher or report | Ctrl + M | Top menu |
| 40 | To print the current voucher or report | Ctrl + P | Top menu |
| 41 | To open the Help menu | F1 | Top menu |
| 42 | To open TallyHelp topic based on the context of the screen that is open | Ctrl + F1 | Top menu |
| 43 | To modify the date of voucher entry or period for reports | F2 | Right button |
| 44 | To modify the date of voucher entry or period for reports | Alt + F2 | Right button |
| 45 | To move to another company from the list of open companies | F3 | Right button |
| 46 | To choose and open another company located in the same folder or other data paths | Alt + F3 | Right button |
| 47 | To close the currently loaded companies | Ctrl + F3 | Right button |
| 48 | To open the list of configurations applicable for the report/view | F12 | Right button |
| 49 | To close a screen or the program | Ctrl + Q | Bottom bar |
Want growth in your Accounting and Finance Career?Be confident! Learn TallyPrime from Industry Experts |
|
| Browse Classroom Course | Browse Online Course |
| More Learning Options for you: TallyPrijme + GST & TDS | TallyPrime + Business Accounting | TallyPrime + Ms Office | TallyPrime + Payroll |
|
Tallyprime shortcut keys to work on Reports (Total 31)
| SL# | Function/Action | Keyboard Shortcuts | Where should you find? |
|---|---|---|---|
| 1 | To add a voucher in a report | Alt+I | Bottom bar |
| 2 | To generate an entry in the report, by duplicating a voucher | Alt+2 | Bottom bar |
| 3 | To remove an entry from a report | Alt+D | Bottom bar |
| 4 | To include a voucher in a report | Alt+A | Bottom bar |
| 5 | To termi-te a voucher from a report | Alt+X | Bottom bar |
| 6 | To remove a line entry from a report | Ctrl+R | Bottom bar |
| 7 | To show all hidden line entries, if they were removed | Alt+U | Bottom bar |
| 8 | To show the last hidden line (If multiple lines were hidden, pressing this shortcut repeatedly will restore the last hidden line first and follow the sequence) | Ctrl+U | Bottom bar |
| 9 | To explore further and open a voucher or master from the last level details of a report | Enter | Bottom bar |
| 10 | To explore further and open a voucher for display | Ctrl+Enter | Bottom bar |
| 11 | To change a master during voucher entry or from drill-down of a report | Ctrl+Enter | Bottom bar |
| 12 | To select/deselect a line in a report | Spacebar | Bottom bar |
| 13 | To choose or deselect a line in a report | Shift+Spacebar | Bottom bar |
| 14 | To choose or deselect all lines in a report | Ctrl+Spacebar | Bottom bar |
| 15 | To display the report in detailed or condensed format | Alt+F1
Alt+F5 |
Right button |
| 16 | To open the GST Portal | Alt+V | Right button |
| 17 | To append a new column | Alt+C | Right button |
| 18 | To change a column | Alt+A | Right button |
| 19 | To remove a column | Alt+D | Right button |
| 20 | To auto repeat columns | Alt+N | Right button |
| 21 | To Refine/filter data in a report, with a selected range of conditions | Alt+F12 | Right button |
| 22 | To calculate balances using vouchers that satisfy the selected conditions | Ctrl+F12 | Right button |
| 23 | To views values in different ways in a report | Ctrl+B | Right button |
| 24 | To change view – display report details in different views
To navigate to Voucher View from Summary reports To navigate to post-dated cheque related transactions report |
Ctrl+H | Right button |
| 25 | To display the exceptions related to a report | Ctrl+J | Right button |
| 26 | To dig down from a line in a report | Enter | – |
| 27 | To stretch or breakdown information in a report | Shift+Enter | – |
| 28 | To choose or deselect lines till the end | Ctrl+Shift+End | – |
| 29 | To choose or deselect lines till the top | Ctrl+Shift+Home | – |
| 30 | To invert selection of line items in a report | Ctrl+Alt+I | – |
| 31 | To Execute linear selection/deselection multiple lines in a report | Shift+Up/Down | – |
Shortcuts use in Vouchers & Masters (Total 25)
| SL# | Function/Action | Keyboard Shortcuts | Where should you find? |
|---|---|---|---|
| 1 | To remove a voucher | Alt+D | Bottom bar |
| 2 | To cancel a voucher | Alt+X | Bottom bar |
| 3 | To remove item/ledger line in a voucher | Ctrl+D | Bottom bar |
| 4 | To mark a voucher as Post-Dated | Ctrl+T | Right button |
| 5 | To autofill details | Ctrl+F | Right button |
| 6 | To change mode – open vouchers in different modes | Ctrl+H | Right button |
| 7 | To open the Stock Query report for the selected stock item | Alt+S | Right button |
| 8 | To mark a voucher as Optio-l | Ctrl+L | Right button |
| 9 | To add more details to a master or voucher for the current instance | Ctrl+I | Right button |
| 10 | To define stat adjustments during voucher entry | Alt+J | Right button |
| 11 | To view list of all vouchers or masters | F10 | Right button |
| 12 | To retrieve -rration from the previous ledger during voucher entry | Alt+R | – |
| 13 | To open the calculator panel from Amount field during voucher entry | Alt+C | – |
| 14 | To open a manufacturing jour-l from the Quantity field of a jour-l voucher | Alt+V | – |
| 15 | To retrieve the -rration from the previous voucher, for the same voucher type | Ctrl+R | – |
| 16 | To go to the next input field | Tab | – |
| 17 | To go to the previous input field | Shift+Tab | – |
| 18 | To remove the value typed | Backspace | – |
| 19 | To create a master, on the fly | Alt+C | – |
| 20 | To open the calculator panel | Alt+C | – |
| 21 | To insert the base currency symbol in an input field. | Alt+4
Ctrl+4 |
– |
| 22 | To open the previously saved master or voucher
To scroll up in reports |
Page Up | – |
| 23 | To open the next master or voucher
To scroll down in reports |
Page Down | – |
| 24 | To copy text from an input field | Ctrl+C
Ctrl+Alt+C |
– |
| 25 | To paste input copied from a text field. | Ctrl+V
Ctrl+Alt+V |
– |
Keyboard Shortcuts to Open Vouchers (Total 17)
| SL# | Function/Action | Keyboard Shortcuts | Where should you find? |
|---|---|---|---|
| 1 | To open Contra voucher | F4 | F10 > Accounting Vouchers |
| 2 | To open Payment voucher | F5 | F10 > Accounting Vouchers |
| 3 | To open Receipt voucher | F6 | F10 > Accounting Vouchers |
| 4 | To open Jour-l voucher | F7 | F10 > Accounting Vouchers |
| 5 | To open Stock Jour-l voucher | Alt+F7 | F10 > Inventory Vouchers |
| 6 | To open Physical Stock | Ctrl+F7 | F10 > Inventory Vouchers |
| 7 | To open Sales voucher | F8 | F10 > Accounting Vouchers |
| 8 | To open Delivery Note | Alt+F8 | F10 > Inventory Vouchers |
| 9 | To open Sales Order | Ctrl+F8 | F10 > Order Vouchers |
| 10 | To open Purchase voucher | F9 | F10 > Accounting Vouchers |
| 11 | To open Receipt Note | Alt+F9 | F10 > Inventory Vouchers |
| 12 | To open Purchase Order | Ctrl+F9 | F10 > Order Vouchers |
| 13 | To open Credit Note | Alt+F6 | F10 > Accounting Vouchers |
| 14 | To open Debit Note | Alt+F5 | F10 > Accounting Vouchers |
| 15 | To open Payroll voucher | Ctrl+F4 | F10 > Payroll Vouchers |
| 16 | To open Rejection In voucher | Ctrl+F6 | F10 > Inventory Vouchers |
| 17 | To open Rejection Out voucher | Ctrl+F5 | F10 > Inventory Vouchers |
Editor keys and Menu keys used in TallyPrime Developer (Total 119)
Editor Keys (Total 67)
| SL# | Function/Action | Keyboard Shortcuts | Where should you find? |
|---|---|---|---|
| 1 | To scroll the cursor up by a line | Up | – |
| 2 | To scroll the cursor down by a line | Down | – |
| 3 | To scroll the cursor left by a character | Left Arrow | – |
| 4 | To scroll the cursor right by a character | Right Arrow | – |
| 5 | To move the cursor to the beginning of the current line | Home | – |
| 6 | To move the cursor to the end of the current line | End | – |
| 7 | To move the cursor one page up at a time | PageUp | – |
| 8 | To move the cursor one page down at a time | PageDown | – |
| 9 | To choose the edit mode or override mode in editor window | Insert | – |
| 10 | To clear the next character from the cursor location or to clear the selected text | Delete | – |
| 11 | To come out of a dialog box, similar to the option ‘cancel’ | Esc | – |
| 12 | To remove one character back from the current location | Back Space | – |
| 13 | To leave one tab space from the current location | Tab | – |
| 14 | To start a fresh line | Enter | – |
| 15 | To choose a line downwards from the cursor position | Shift + Down | – |
| 16 | To choose a line upwards from the cursor position | Shift + Up | – |
| 17 | To choose a character left of the cursor position | Shift + Left Arrow | – |
| 18 | To choose a character to the right of the cursor position | Shift + Right Arrow | – |
| 19 | To choose the text from the cursor location to the starting point of the line | Shift + Home | – |
| 20 | To choose the text from the cursor location to the ending point of the line | Shift + End | – |
| 21 | To choose one page up from the cursor location | Shift + PageUp | – |
| 22 | To choose one page down from the cursor location | Shift + PageDown | – |
| 23 | To paste the content from clipboard | Shift + Insert | – |
| 24 | To cut the selected text | Shift + Delete | – |
| 25 | To remove one character back from the current location | Shift + Back Space | – |
| 26 | To move the cursor one tab back from the current location | Shift + Tab | – |
| 27 | To start a fresh line | Shift + Enter | – |
| 28 | To copy contents from multiple locations or to paste the selected contents at multiple locations | Ctrl + <Mouse Click> | – |
| 29 | To scroll the page one line down at a time | Ctrl + Down | – |
| 30 | To scroll the page one line up at a time | Ctrl + Up | – |
| 31 | To adjust position the cursor a word left | Ctrl + Left Arrow | – |
| 32 | To adjust position the cursor a word right | Ctrl + Right Arrow | – |
| 33 | To adjust position the cursor at the beginning of the file | Ctrl + Home | – |
| 34 | To adjust position the cursor at the end of the file | Ctrl + End | – |
| 35 | To copy the selection | Ctrl + Insert | – |
| 36 | To delete a word right from the cursor location | Ctrl + Delete | – |
| 37 | To cut the current line | Ctrl + L | – |
| 38 | Toggles current line with the line above it | Ctrl + T | – |
| 39 | To remove one word back from the current location | Ctrl + Back Space | – |
| 40 | To position the cursor to the next definition in a file | Ctrl + ] | – |
| 41 | To position the cursor to the previous definition in a file | Ctrl + [ | – |
| 42 | To position the cursor at the beginning of the line | Alt + Home | – |
| 43 | To position the cursor to the end of the line | Alt + End | – |
| 44 | Undo | Alt + Back Space | – |
| 45 | To Shift one line down during column selection | Alt + Shift + Down | – |
| 46 | To Shift one line up during column selection | Alt + Shift + Up | – |
| 47 | To Shift one character left during column selection | Alt + Shift + Left Arrow | – |
| 48 | To Shift one character right during column selection | Alt + Shift + Right Arrow | – |
| 49 | To extend the rectangular selection to the starting of the line | Alt + Shift + Home | – |
| 50 | To extend the rectangular selection to the end of the line | Alt + Shift + End | – |
| 51 | To choose one page up from the current location during column selection | Alt + Shift + PageUp | – |
| 52 | To choose one page down from the cursor location during column selection | Alt + Shift + PageDown | – |
| 53 | To choose one paragraph up | Ctrl + Shift + [ | – |
| 54 | To choose one paragraph down | Ctrl + Shift + ] | – |
| 55 | To choose a word from the left | Ctrl + Shift + Left Arrow | – |
| 56 | To choose a word from the right | Ctrl + Shift + Right Arrow | – |
| 57 | To choose the text from the cursor location to the beginning of the file | Ctrl + Shift + Home | – |
| 58 | To choose the text from the cursor position to end of the file | Ctrl + Shift + End | – |
| 59 | To remove the line right from the current location | Ctrl + Shift + Delete | – |
| 60 | To remove the line left from the current location | Ctrl + Shift + Back Space | – |
| 61 | To remove the current line | Ctrl + Shift + L | – |
| 62 | To copy the current line | Ctrl + Shift + T | – |
| 63 | To zoom in to the Editor Window | Ctrl + Shift + ‘+’ | – |
| 64 | To zoom out of the Editor Window | Ctrl + Shift + ‘-‘ | – |
| 65 | To add bookmarks along required lines in the Editor | Ctrl + F2 | – |
| 66 | To navigate to the Previous bookmark | Shift + F2 | – |
| 67 | To navigate to the Next bookmark | F2 | – |
Menu Keys (Total 52)
| SL# | Function/Action | Keyboard Shortcuts | Where should you find? |
|---|---|---|---|
| 1 | Delete | Del | |
| 2 | To get the Help Manual | F1 | |
| 3 | To find the next occurrence in the current file | F3 | |
| 4 | To find and replace the next search result | F4 | |
| 5 | To compile a file | F7 | |
| 6 | To build the current project | F9 | |
| 7 | To go back to the previous search result | Shift + F3 | |
| 8 | To find and replace the previous search result | Shift + F4 | |
| 9 | To directly jump to any other File | Alt + P | |
| 10 | To hide Explorer window | Alt + 1 | |
| 11 | To hide Output window | Alt + 2 | |
| 12 | To create a new TDL file | Ctrl + N | |
| 13 | To open an existing TDL file | Ctrl + O | |
| 14 | To save a file or a project | Ctrl + S | |
| 15 | Undo | Ctrl + Z | |
| 16 | Redo | Ctrl + Y | |
| 17 | Select all | Ctrl + A | |
| 18 | Cut | Ctrl + X | |
| 19 | Copy | Ctrl + C | |
| 20 | Paste | Ctrl + V | |
| 21 | Execute OS Command | Ctrl + E | |
| 22 | To find a text in the current file | Ctrl + F | |
| 23 | To locate the given text in all the files | Ctrl + D | |
| 24 | Move to a Line number | Ctrl + G | |
| 25 | To find and replace a text with a new text | Ctrl + H | |
| 26 | To directly Jump to any Definition | Ctrl + J | |
| 27 | To go to Project Explorer | Ctrl + 1 | |
| 28 | To go to Output Window | Ctrl + 2 | |
| 29 | To go to Edit Pane | Ctrl + 3 | |
| 30 | To go to Definition Explorer | Ctrl + 4 | |
| 31 | To go to Schema Explorer | Ctrl + 5 | |
| 32 | To go to Build Window | Ctrl + 6 | |
| 33 | To go to Search Window | Ctrl + 7 | |
| 34 | To go to Function Browser | Ctrl + 8 | |
| 35 | To go to Action Browser | Ctrl + 9 | |
| 36 | To move to the next search location | Ctrl + F3 | |
| 37 | To compile a project | Ctrl + F7 | |
| 38 | To move to the original description from a reference or modifier | Ctrl + Dot | |
| 39 | To expand the pointed definition | Ctrl + Plus | |
| 40 | To collapse the pointed definition | Ctrl + Minus | |
| 41 | To show all the references for the current description | Ctrl + / | |
| 42 | To jump to previous location | Ctrl + PgUp | |
| 43 | To jump to subsequent location | Ctrl + PgDn | |
| 44 | To create a new project | Ctrl + Shift + N | |
| 45 | To open an existing project | Ctrl + Shift + O | |
| 46 | To comment one or more lines | Ctrl + Shift + C | |
| 47 | To uncomment one or more commented lines | Ctrl + Shift + U | |
| 48 | To move to the previous search location | Ctrl + Shift + F3 | |
| 49 | To show all the modifiers for the current description | Ctrl + Shift+ / | |
| 50 | To exit from Tally Developer | Ctrl + Alt + Q | |
| 51 | To open the Attribute References Search Dialog | Ctrl + Alt + A | |
| 52 | To open the Definition References Search Dialog | Ctrl + Alt + D |
Most Important TallyPrime Shortcut Keys for regular use
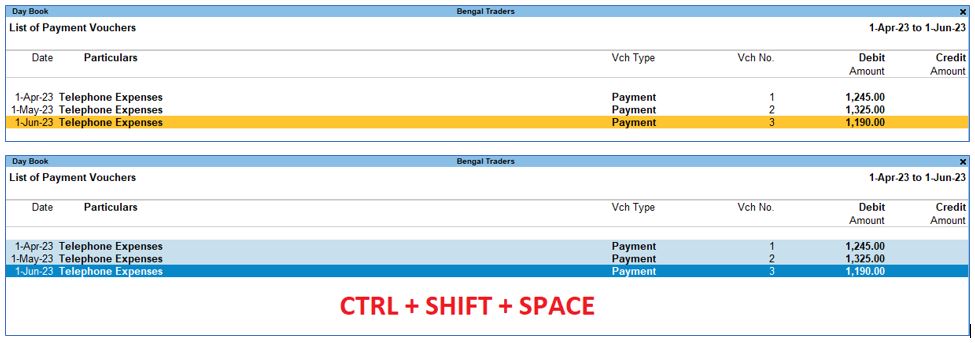
The Day Book in TallyPrime is a record of all transactions made on a particular day. It is an important tool for businesses to track their daily performance, such as sales, purchases, and profitability. If you find a mistake or an error in your Day Book, you can easily delete or remove the affected entries. You can also add, insert, or duplicate entries to correct any missing information.
In TallyPrime, the Day Book is a summarized record of all the financial transactions that took place on a specific day.
1. How to select all entries in a day book in TallyPrime?
Scenario:
ABC Enterprises uses TallyPrime to record its daily transactions. The finance team needs to quickly access the Day Book to prepare daily reports.
Steps to Select All Entries:
- Log into TallyPrime to Access the software with authorized credentials.
- Find and click “Day Book.”
- Choose Date: Pick the desired date, e.g., August 23, 2023.
- Use the CTRL+SHIFT+SPACE key to highlight all transactions for the chosen date.
- Print or export the report in preferred format.
- Analyze the report for insights.
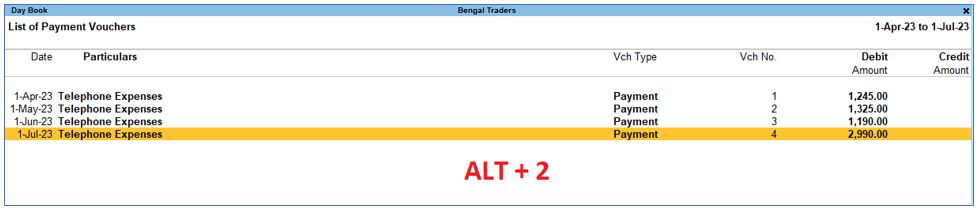
2. How to find duplicate entries in a day book in tally prime?
Scenario:
Mr. Sunil is working as an accountant in Global Traders Enterprises. He often deals with similar transactions on a recurring basis, such as telephone expenses. Manually entering these transactions each time is time-consuming. So, he was looking for ways to manage it.
Upon realizing the repetitive nature of certain transactions, He decided to leverage the “Duplicate Entry” functionality in Tally Prime. This feature allows users to copy an existing entry and make necessary modifications, saving time and reducing the errors.
Steps to find duplicate entries:
- Log in with authorized credentials.
- Access the “Day Book” from the dashboard.
- Select a specific date range for focus.
- Arrange by date, ledger, amount, or voucher type.
- Manually scan for identical or similar entries.
- Isolate transactions using filters. Just select existing entry and press ALT + 2 key.
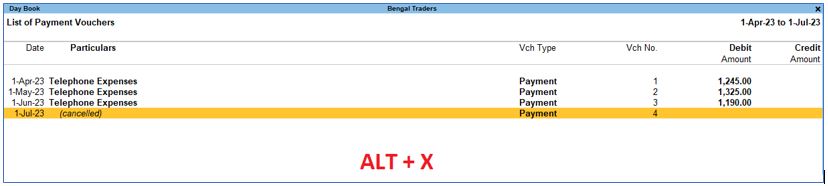
3. How to cancel a voucher in tallyprime?
Scenario:
Khosla Electronics recently realized that a sales voucher from last week was recorded incorrectly in TallyPrime. To rectify this, they need to cancel the incorrect voucher and ensure that their financial records accurately reflect the transaction.
Steps to Cancel a Voucher:
- Log in to TallyPrime using credentials.
- Go to “Voucher Register.”
- Find the incorrect voucher.
- Verify and open it.
- Select the entry and then press ALT + X key.
- Enter reason for cancellation.
- Confirm cancellation to reverse effects.
- Check updated financial data.
- Enter accurate voucher data.
- Keep cancellation record.
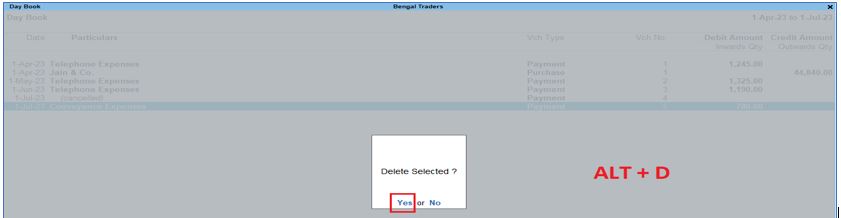
4. How to delete voucher entry in TallyPrime?
Scenario:
Sun Pharmaceuticals Ltd recently discovered an erroneous payment voucher that was incorrectly entered into TallyPrime. To uphold the integrity of their financial data, they need to delete this incorrect voucher entry.
Steps to delete voucher entry:
- Login to access TallyPrime using credentials.
- Go to “Voucher Register.”
- Find the entry for deletion.
- Verify it’s the correct entry.
- Select the entry then Press ALT + D key.
- Confirm deletion to prevent accidents.
- Optionally, give a deletion reason.
- Double-confirm the deletion.
- Ensure the entry is removed.
- Document the deleted entry.
5. How to Hide and Unhide Entry in TallyPrime Voucher?
Scenario:
Sunrise Manufacturing has recorded a confidential payment transaction in TallyPrime that should not be visible to all users. They need to hide this entry from regular users while retaining access for authorized personnel.
Steps to hide a voucher entry:
- Login to TallyPrime with credentials.
- Navigate to relevant voucher entry.
- Use the “Hide” option or press CTRL + R) key within the entry details.
- Confirm with password or authorization.
- Enter a reason for hiding.
- Validate the hide action.

Steps to unhide an voucher entry:
- Access hidden entry, locate “Unhide” option or press CTRL + U key.
- Authenticate unhiding.
- Validate unhiding action.
- Ensure proper hiding or unhiding.

6. How to shut a company in TallyPrime?
Scenario:
Suppose, Mr Trivedi is a very busy accountant who uses TallyPrime to manage the financial records of multiple clients. He have several company files open at the same time on his computer. Now he need to shut a company in TallyPrime.
Steps to shut a company:
- Press Ctrl + F3 or Alt + F1 keys to open the Shut Company dialog box.
- Select the company you want to shut and press Enter or click the Shut button.
- If you have any unsaved transactions or vouchers in the company, you will be prompted to save them. Click Yes to save the transactions and vouchers, or click No to discard them.
- The company will now be shut down.
Note: If you have any unsaved transactions or vouchers in the company, you will be prompted to save them before the company is shut down.
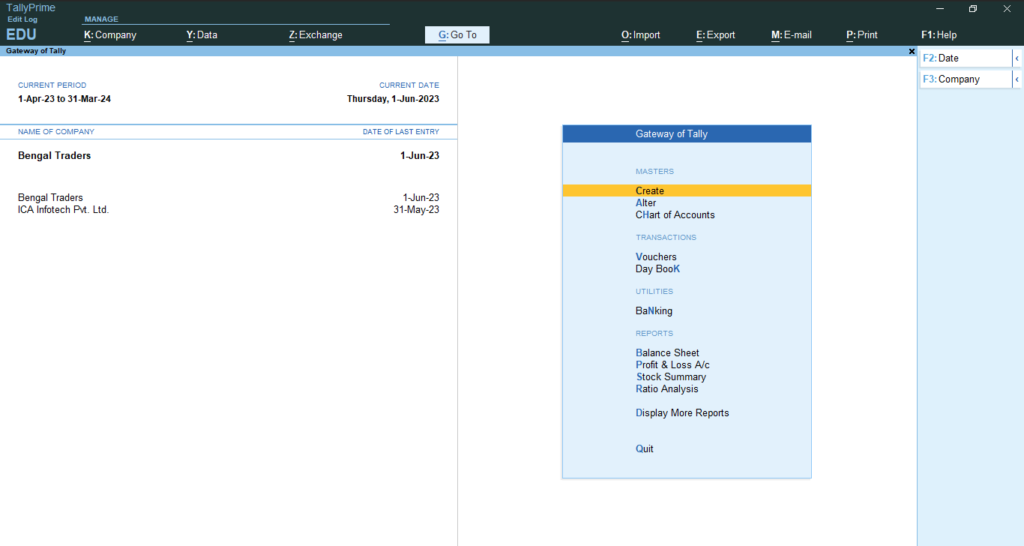
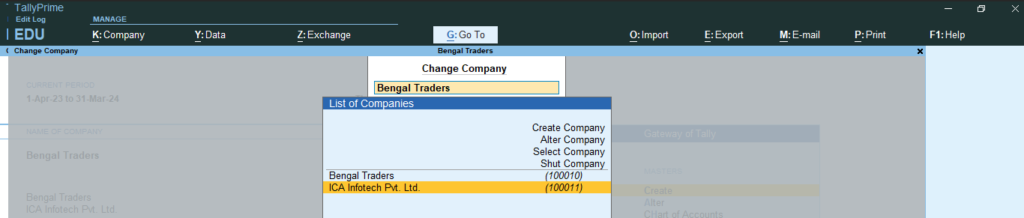
7. How to change a company in TallyPrime?
Scenario:
Let us suppose Mr Trivedi as an accountant uses TallyPrime accounting software to oversee the financial records of numerous clients. Currently, he have multiple company files open concurrently on your computer, and he require a seamless method to switch between them.
Steps to change a company:
- Press the F3 key on your keyboard. This action triggers a dialog box to appear on your screen, displaying a list of all the open companies.
- Use your keyboard arrow keys or your mouse pointer to select the company you want to switch to.
8. How to modify or rewrite your company data in TallyPrime?
Scenario:
Often an accountant needs to rewrite data in TallyPrime to repair corrupted data, migrate data from an older version of Tally, optimize data performance, or clean up data.
Steps to rewrite your company data:
- Open TallyPrime and go to the Gateway of Tally or the Company Info menu.
- Press Ctrl + Alt + R keys to open the Rewrite Company screen.
- Select the company for which you want to rewrite data.
- Press Enter to rewrite the data.
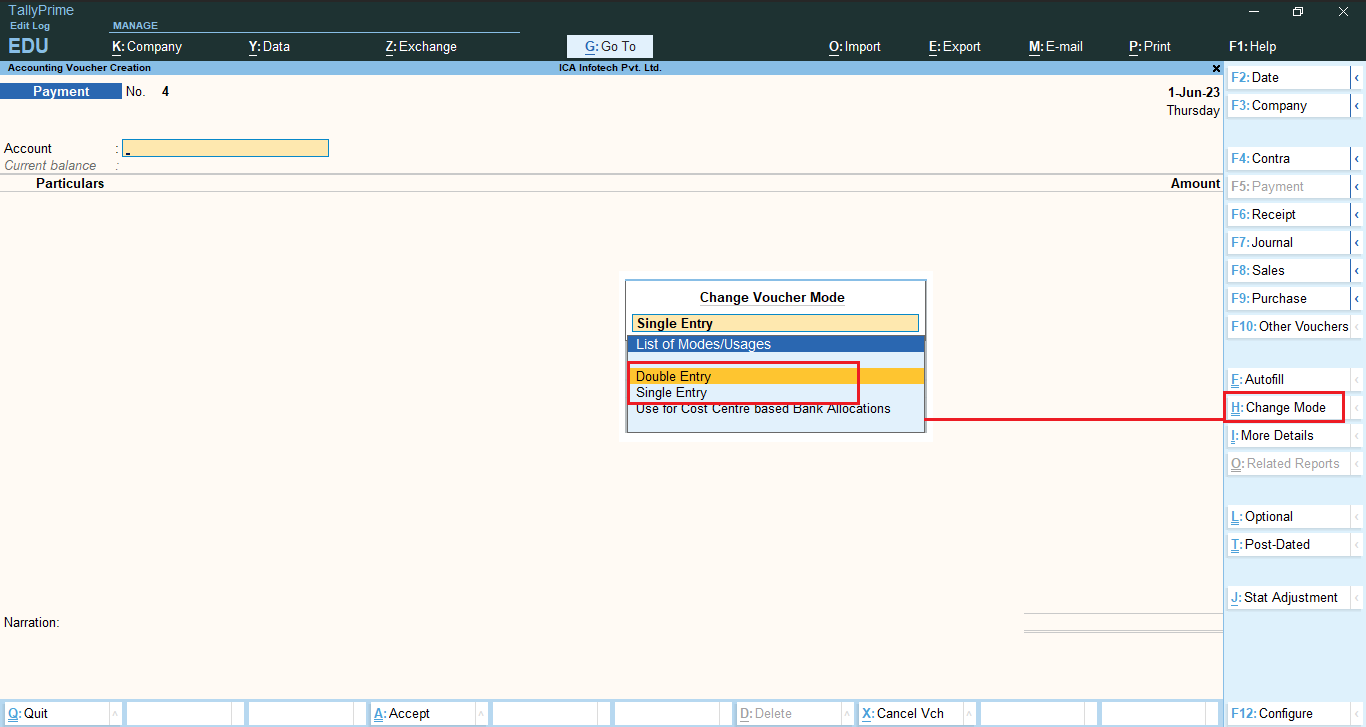
9. How to change voucher mode (Double Entry/Single Entry) in TallyPrime?
Scenario:
Let’s assume MP Traders is a small retail business where diverse daily expenses such as disbursing your staff’s daily salaries, procuring office supplies, managing printing expenses, and addressing miscellaneous costs occur. Utilizing the single-entry mode in TallyPrime streamlines the process, particularly for individuals who may not have expertise in accounting.
Steps to change voucher mode:
TallyPrime’s single-entry mode to streamline processes is beneficial for individuals with limited accounting expertise. Simply press the keyboard shortcut Ctrl + H keys to activate this feature.
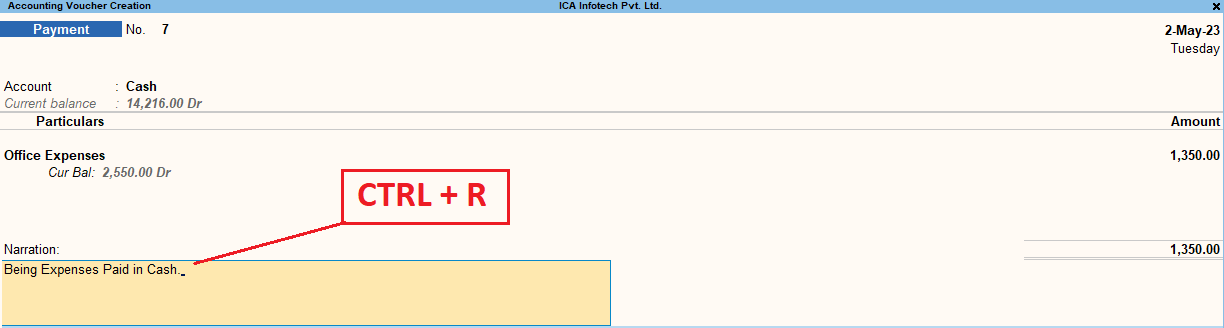
10. How to add Narration in TallyPrime?
Scenario:
Consider Mr. Kothari, an accountant for a retail store uses TallyPrime software to handle financial transactions. His tasks for today involve recording several transactions in Tally, including payment vouchers.
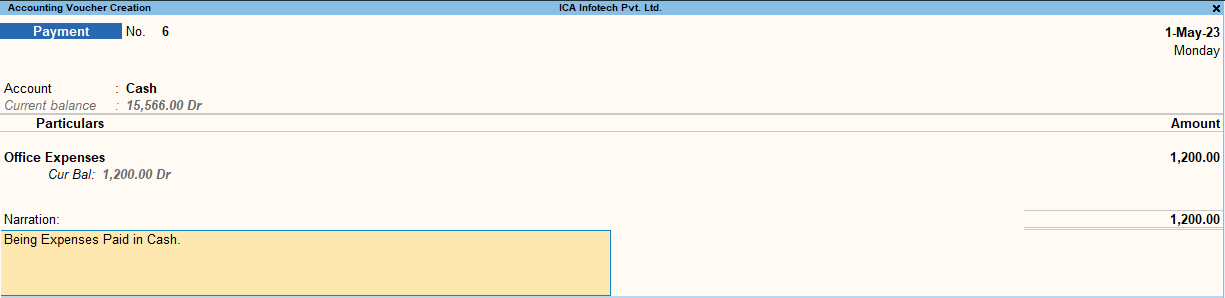
As he initiate the creation of a new payment voucher in Tally to account for today’s cash expenses, he notice that the narration for this payment is identical to yesterday’s. To save time, you aim to duplicate the narration from the previous day’s payment voucher instead of manually retyping it.
Steps to rewrite your company data:
He can simplify this process using Ctrl + R shortcut for the same
Conclusion
This blog emphasizes its role in boosting efficiency by enabling swift navigation and simplified task execution. , these shortcuts are designed with a user-friendly interface to cater to users of varying accounting expertise, contributing to increased productivity. Mastering the use of these shortcut keys not only saves significant time but also reduces the learning curve, making TallyPrime more accessible. The versatile functionality of shortcut keys extends across various tasks, providing users with a quick reference guide for a streamlined and positive user experience.
About The Author

Debjit Chakraborty
Certification : Certified Microsoft Excel Expert and Tally Profession: Ms Excel, TallyPrime Trainer Organization: Corporate Trainer – Technical Quality Assurance at “ICA Edu Skills Pvt. Ltd".
Industry Experience :Expert of MS Office and Tally, with over 16+ years of experience, trained more than 7,000+ individuals and Delivered Master Classes for over 100+ trainers of Excel and Tally. Mr. Debjit Chakraborty has a rich experience in training for over 16+ years. He has trained over 7,000+ students and over 100+ trainers of Excel and Tally.
Linkedin Profile:https://in.linkedin.com/in/debjit-chakraborty-873b6887