
Manage Multiple GST in TallyPrime Release 3.0 – A Step by Step Guide
If you are running a business, or just looking for information on managing multiple GSTI then you are landed in the right place. We will explore in this Guide, How this software works in managing Multi GST with real-life case scenarios.
In the current aspect of taxation and compliance, businesses are facing the challenge of managing multiple GSTINs (Goods and Services Tax Identification Numbers) within a single company. TallyPrime is an accounting software that helps to manage financial operations, accounting, taxation, and payroll processing. This software helps businesses to maintain correct financial records.
Nowadays, most companies either operate in different states or serve different types of services. In both cases, they have to deal with Multi GSTINs. Tally Prime has emerged as their backbone to make the process easy to manage for Multi GSTINs.
Let’s start with the basic concept of firstly MULTI GST.
What is Multi GST in TallyPrime?
Multi GST in TallyPrime refers to the power of the TallyPrime accounting software to handle and manage multiple GSTs within a single company. GST is a unique identification number assigned to businesses registered under the Goods and Services Tax (GST) regime in India.
With the Multi GST feature in TallyPrime, businesses that operate in
- Different states or regions,
- Multiple branches or
- Engage in diverse business activities
You can efficiently manage their tax compliance and reporting requirements. This feature of TallyPrime allows businesses to maintain separate accounting and reporting for each GSTIN while keeping data in one location and managing operations.
Hope Now, you have a basic understanding of the topic, or else you can explore courses on GST and Tallyprime to learn the core concepts.
Explore the Trending GST CoursesLearn from Industry Experts |
|
| Browse Classroom Course | Browse Online Course |
| More Learning Options for you: GST Certification Course | TallyPrime with GST and TDS | GST & TDS |
|
Moving forward we will see the importance of Multi GST in TallyPrime.
The Significance of Multi GST in TallyPrime
Consolidated Data Management:
With Multi GST support, TallyPrime enables businesses to centralize financial data from multiple GST into a single platform.
For example, consider a clothing retailer with stores in different states. Using Multi GST in TallyPrime in their business will help them to centralize sales data, inventory levels, and tax records. All the features of TallyPrime ensure efficient monitoring and analysis of their business.
Efficient Compliance:
TallyPrime takes the complication out of compliance by automating GST return filing and other compliance-related tasks for each GST. This feature helps in the accurate and timely submission of returns. Thus it reduces the risk of penalties and errors.
For example, a manufacturing company with operations across states can ensure that each GST return is filed correctly and on time using TallyPrime’s automated features.
Inter-Branch Transactions:
For companies with multiple branches or units operating in different states. TallyPrime simplifies smooth inter-branch transactions. It takes care that tax implications are accurately managed during stock transfers and other transactions.
Let us consider a pharmaceutical company with warehouses across regions. Multi GST in TallyPrime ensures that stock transfers between warehouses are correctly accounted for, minimizing tax-related complexities.
Precise Financial Reporting:
Businesses can generate detailed financial reports for each GSTIN. Thus it provides insights into revenue, expenses, taxes, and profitability.
For example, a restaurant chain with outlets in various cities can analyze financial reports for each GSTIN to optimize operations and identify profitable locations.
Real-time Insights:
Multi GST in TallyPrime 3.0 offers real-time visibility into the financial performance of each segment of the business. It makes sure resources are assigned on time for better decision-making.
A hotel group operating in different states can use TallyPrime’s insights to allocate marketing budgets effectively and tailor promotions based on individual GSTIN performance.
No, idea How to implement Multi GSTIN? We are here to guide you with each step. But if you have any doubt about GST or looking for information in Tally Prime. Look no further we have designed the TallyPrime course also.
Implementing Multi GSTIN in TallyPrime: A Step-by-Step Approach
Setting Up GSTINs: Begin by adding the multiple GST associated with your business. TallyPrime allows you to add and manage these GST within the software.
Masters Segregation: To ensure accurate data management, maintain separate ledgers, stock items, and other relevant data for each GST. This division of data ensures that transactions are correctly associated with the appropriate GST.
Recording Transactions: As you conduct business transactions, ensure that each transaction is linked to the relevant GST. TallyPrime’s user-friendly interface allows for easy selection of the appropriate GST during data entry.
GST Returns Generation: TallyPrime automates generating GST returns for each GST. It collects transaction data, calculates taxes, and generates accurate GST returns. Thus reducing the manual effort required for compliance.
GST Reconciliation: Utilize TallyPrime’s reconciliation features to match your purchase data with GSTR-2A data, minimizing error and ensuring accurate input tax credit reconciliation.
Check out the article on Types of GST in India to learn the basics of GST that add value to your knowledge base. Even you can go through the GST return types article for more information on the basic GST concept.
Benefits of Multi GSTIN in TallyPrime
- Time Efficiency: Multi GST in TallyPrime 3.0 significantly reduces the time spent on manual data entry, calculations, and return filing. The software works automatically which increases efficiency and allows businesses to focus on other core operations.
- Error Reduction: Manual data entry is likely to have errors, which can lead to compliance issues. With the add-on advantage of data automation and validation features, TallyPrime minimizes errors, ensuring accurate GST returns.
- Centralized Control: Multi GST in TallyPrime 3.0 provides centralized control and visibility over all GST. Businesses can keep records of transactions, check financial reports, and manage compliance tasks from a single platform.
- Scalability: As your business grows and expands, Multi GST support scales with you. It can adjust the new GST and ensure smooth management across multiple states.
- Accurate Taxation: TallyPrime’s automated tax calculations and powerful reporting capabilities contribute to accurate taxation. Ultimately the chances of penalties and audits are reduced.
- Strategic Decision-Making: Real-time data into the financial performance of each GST empower businesses to make informed decisions. Businesses can allocate resources effectively, and maximize growth opportunities.
Still, if you are confused How it works? Let’s explore more with a real-life example. Or if you are interested to learn more about GST and its implementation check GST Certification Course.
Even you can check the GST basic concept guide for students to learn the basic GST
Certainly! Let’s explore a real-life example of multi-GST implementation for a business that operates in multiple states within a single country.
How to use multiple GST in Tally Prime?
Using multiple GSTINs (Goods and Services Tax Identification Numbers) in TallyPrime allows you to manage transactions and compliance for different divisions of your business that are registered under separate GST.
Here’s a step-by-step guide on how to use multiple GST in TallyPrime:
Step 1: Enable Multi-GST Feature:
Step 1.1: Open TallyPrime and load your company data.
Step 1.2: Go to “Gateway of Tally.”
Step 1.3: Navigate to “F11: Features” > “F3: Statutory & Taxation.”
Step 1.4: Under the “Goods & Services Tax (GST)” section, set the option “Enable Multi GSTIN for Company” to “Yes.”
Step 1.5: Save the changes
Step 2: Add GST Details:
Step 2.1: After enabling the Multi-GST feature, go to “Gateway of Tally.”
Step 2.2: Select “Masters” and then “GST.”
Step 2.3: Add details for each GST that your company is registered under, including the state, location, and other relevant information.
Step 3: Create Masters with GST:
While creating or updating masters like ledgers, stock items, or parties, ensure you assign the appropriate GST. This associates the master with the correct GST registration.
Step 4: Record Transactions:
While recording transactions, select the appropriate GST based on the location of the transaction. TallyPrime will prompt you to choose the correct GST associated with the branch or location.
Step 5: Generate Invoices:
When generating invoices, ensure that you select the correct GST for the billing and shipping addresses. TallyPrime will automatically populate the GST details on the invoice.
Step 6: GST Return Filing:
- Navigate to “Display” > “Statutory Reports” > “GST Reports.”
- Generate GST returns for each GST separately by selecting the relevant GST from the options.
Step 7: Cross-Verify Data:
Regularly cross-verify your transactions and GST returns to ensure accuracy and compliance for each GST.
Step 8: Manage Branch/Location-wise Compliance:
You can manage GST compliance, transactions, and reporting for each GSTIN separately. This is particularly useful when dealing with inter-state transactions or different tax rates for different locations.
Step 9: Keep Records Organized:
Use the GST details and associated reports in TallyPrime to keep your records organized and easily accessible for auditing or reporting purposes.
It’s important to note that using multiple GST in TallyPrime requires careful attention to detail and accurate data entry to ensure compliance and accurate reporting. Regularly update your GST details and maintain consistency in recording transactions to make the most of this feature and streamline your GST management.
Read more related articles on GST and TallyPrime.
GST Basic Concepts
Ultimate GST Audit Checklist Guide
Top 10 Facts about GST in India
Reverse Charge Mechanism Under GST
Case Scenario: Multi GSTINs implementation
Let us consider an example of a retail chain named “Avenue Supermart (DMart)” with stores in different states nationwide. DMart sells different products from clothes and electronics items to home appliances and groceries.
With time, DMart is getting popular and its customers are increasing. Now, DMart has decided to expand its business. Thus it opened many new stores in different cities and states. While operating in multiple states, DMart started facing the issue of managing its taxation and compliance requirements efficiently. As the different states may have different tax rates and other requirements.
Here we will see, How DMart used TallyPrime to resolve its issue of Multi GSTINs management.
Configuration and Setup:
DMart uses TallyPrime’s Multi GSTIN functionality to set up its operations. The business configures each store location as separate GSTIN entities within the software. This allows DMart to maintain accurate records of each location. DMart now efficiently maintains state-specific tax regulations.
Masters Segregation:
For precise data management, DMart maintains separate ledgers and stock items for each store location. For example, if one store is located in Maharashtra and another in Karnataka. SuperrMart ensures that stock items belong to the appropriate GSTIN based on the state of operation.
Point of Sale (POS) Transactions:
When customers make purchases at DMart’s stores, the POS system helps the cashier select the relevant GSTIN based on the store’s location. This ensures that the correct tax rates are applied to the transaction and that the invoice reflects the correct GSTIN information.
Invoicing and Billing:
TallyPrime generates invoices that match the tax regulations of each state. For example, if a customer purchases goods at DMart’s store in Maharashtra, the invoice includes the GSTIN specific to Maharashtra and the applicable state tax rates.
GST Return Filing:
As the end of the tax period approaches, DMart uses TallyPrime to generate GST returns for each store’s GSTIN. The software automatically collects transaction data and calculates taxes. Thus it manages the return filing process smoothly.
DMart can file accurate GSTR-1 and GSTR-3B returns for each store’s GSTIN, ensuring compliance with state tax authorities.
Confused with the terms GSTR-1, GSTR -3B. Don’t worry read the complete blog on GST.
Inter-State Stock Transfers:
DMart often transfers stock between stores in different states to meet demand. TallyPrime’s Multi GSTIN support ensures that these inter-state stock transfers are accurately recorded. The software considers the tax implications of such transfers to minimize tax-related complexities.
Financial Reporting:
DMart benefits from TallyPrime’s reporting capabilities to analyze the financial performance of each store location. The software can create detailed reports that provide data on sales, expenses, and taxes collected or paid for each GSTIN. This data helps DMart in making informed business decisions and improving operations.
Compliance and Accuracy:
Using TallyPrime, DMart reduces the risk of errors in tax calculations and return filings. The TallyPrime Software 3.0 offers a better data validation feature that helps in the accurate input of tax credits. It balances data more accurately for all locations.
In this example, We have seen How DMart successfully implemented Multi GSTIN in TallyPrime.
The software easily handles Multi GSTINs management of all the stores that are operating in different states. The software follows standard rules as per the state tax regulations and increases accuracy in tax-related processes.
The software’s automation and data management features help DMart to focus on its core business while maintaining the complexities of multi-state taxation.
Hope now you have some idea on the topic. If you are looking for more information go through the GST reconciliation in the Tally Prime blog.
If you are a student and looking for some basic information on GST courses then read these articles
Top 10 GST Training FAQs Students Ask Before Enrolling
Enroll in the best GST Course Near Me!
Top 15 Common GST Interview Questions and Answers
GST Courses: Career Benefits Explained For Students & Professionals
Explore Real-Life Cases With TallyPrime 3.0>
We will see here how TallyPrime 3. O work with its new feature of multiple GST registration.
TallyPrime is an accounting software that is frequently updated by its developers. This new TallyPrime 3.0 comes with a new feature where Multiple GST registration is possible under a single creation of the company.
Scenario:
Let us consider you own a company named ‘Realtek Industries Pvt Ltd’. It has its main branch in West Bengal but other branches are operating in Orissa and Bihar. Thus, your company will also be having different registrations for each state with a single PAN. Earlier.
In this case, TallyPrime 2.0 only allowed users to create a new company for each registration. But in TallyPrime 3.0 it is possible to create a single company with multiple registrations.
Let’s see How TallyPrime 3.0 works in this case.
In the below table, the GST details of Realtek industries are mentioned for their respective branches of West Bengal, Orissa, and Bihar.
| Realtek Industries Pvt Ltd | |
| PAN: AAACR5055K | |
| Branch | GSTN |
| West Bengal (Main Branch) | 19AAACR5055K1Z4 |
| Orissa | 21AAACR5055K1ZJ |
| Bihar | 10AAACR5055K1ZM |
To enable the multi GST feature first Go to F11 from Gateway of Tally.
Set ‘Yes’ for ‘Enable multiple addresses’ under the Others Tab.
Set ‘Yes’ for ‘Enable Goods and Services Tax (GST)’ under the Taxation Tab.

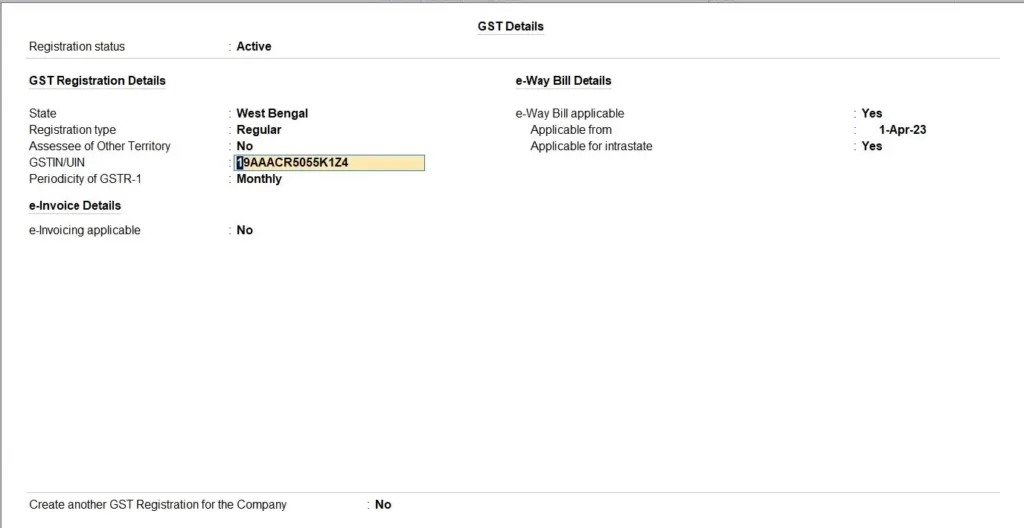
Set this option Create another GST registration for the company as ‘Yes’ after filling all the details above.
This option is displayed at the bottom of your GST Details window.
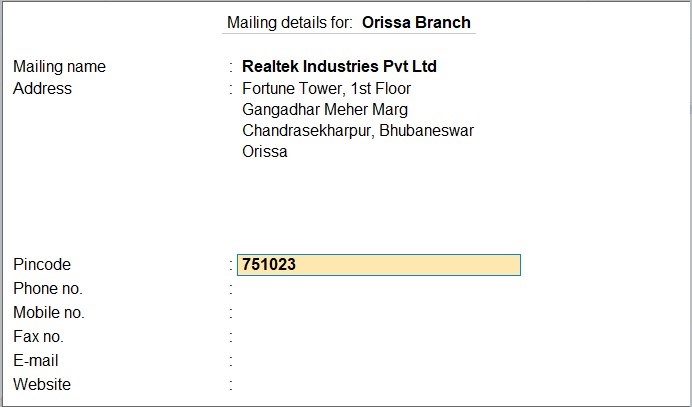
A new window will pop up asking you to set your primary branch and its addresses.
<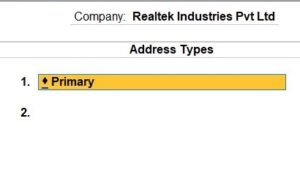
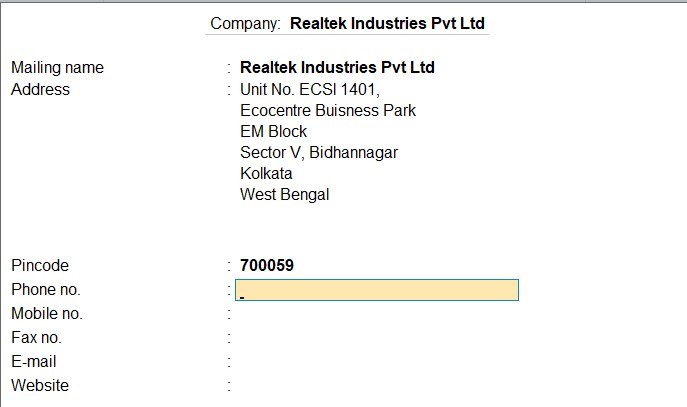
Type in the necessary details as shown on the screen below.
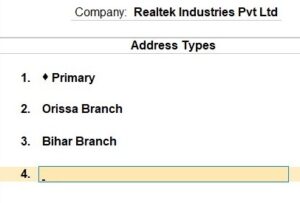
Do the same for your Bihar Branch as well.
Save everything. And then again go to Gateway of Tally F11.
Hit Enter after ‘Enable Goods and Services Tax (GST)’
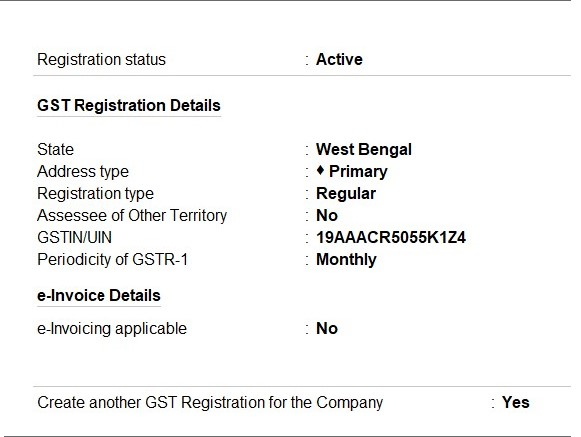
Set ‘Yes’ Create another Registration for the Company from the bottom of the screen, after filling in all the details of West Bengal (Main Branch). And then again fill in all your details as it is shown in the picture below.
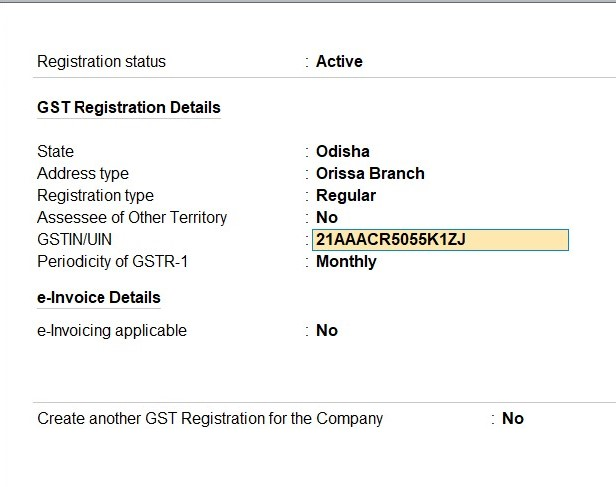
Fill In the address and GST details for your Bihar ‘Branch’ in the same way as it is done for your ‘Orissa Branch in the above picture.
Once you enter all the necessary details and proceed below screen will pop up asking you to create a unique voucher numbering series for each of your branches.

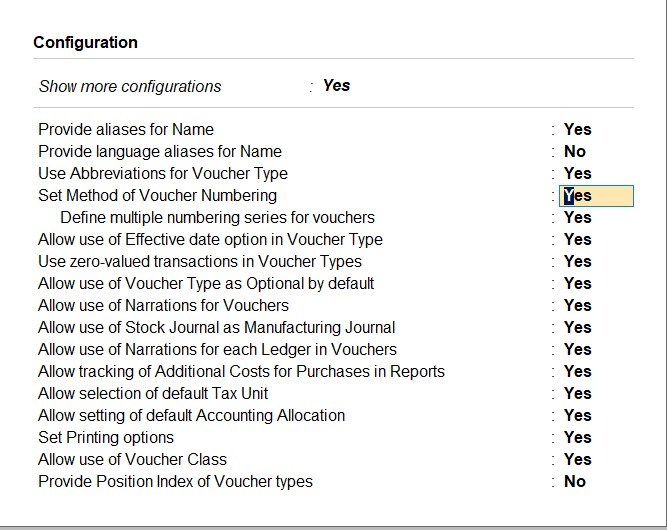
Go to Gateway of tally>>Alter>>Voucher type>>Sales Voucher>>F12.
Set ‘Yes’ to ‘Set Method of voucher numbering’ & ‘Define multiple numbering series for Vouchers’.
On your ‘Sales Voucher’ Alteration screen.
Set ‘Yes’ ‘Set/Alter additional numbering details and a below screen will pop up.
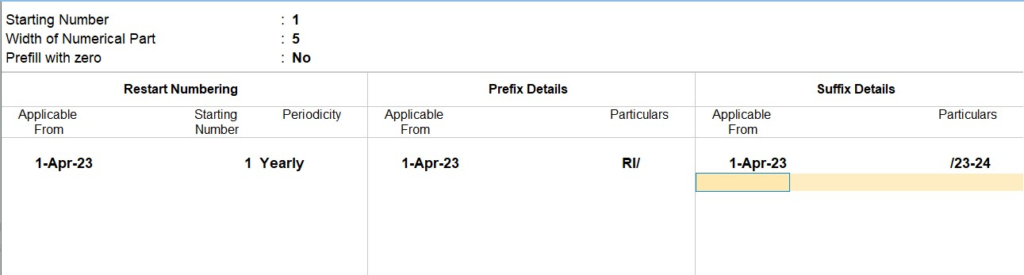
Again, do the same for each of your branches. You can do so by ‘Create’ option below.

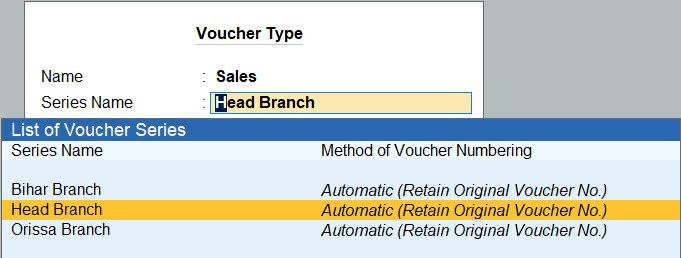
Now we will try to pass a ‘Sales Voucher’. Upon pressing F8 for Sales. A dialog box will now appear which will ask you to choose under which branch would you like to pass this voucher.
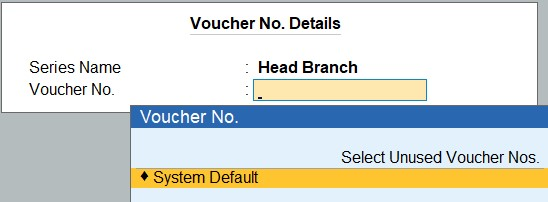
Then again press F3 to choose the branch for the selection of your Voucher number.
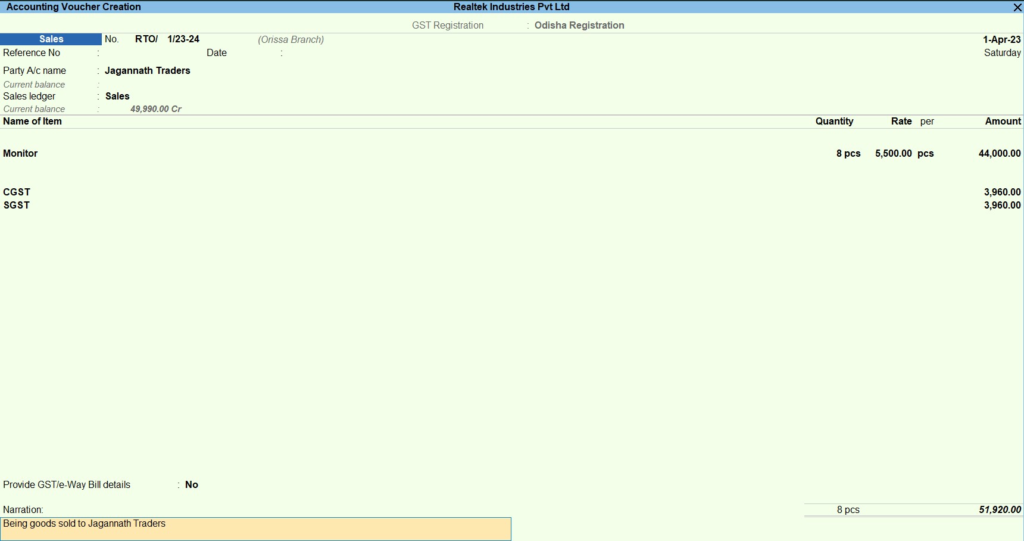
After this when you pass your Sales Voucher, it will look like this.
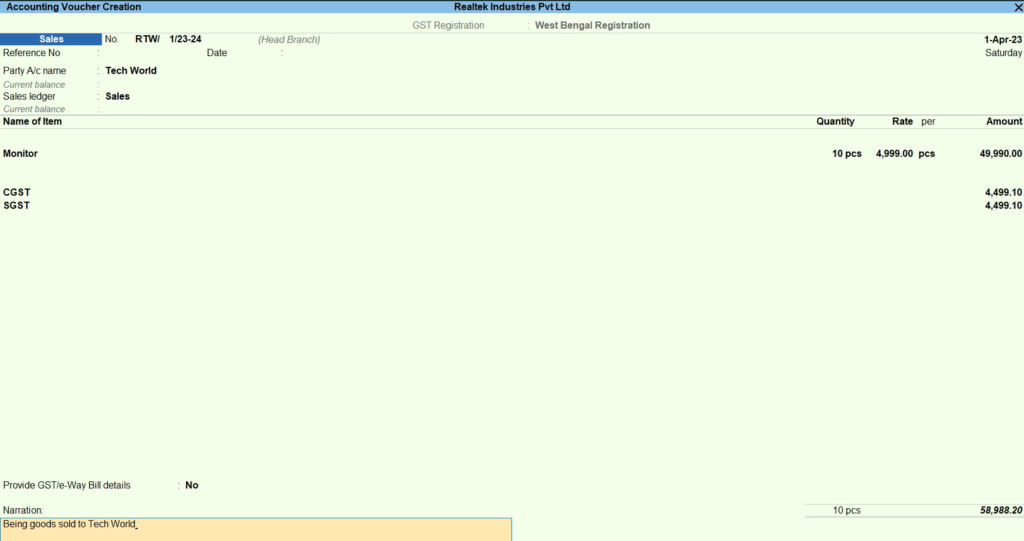
Similarly, below is the Sales Voucher for your Orissa branch.
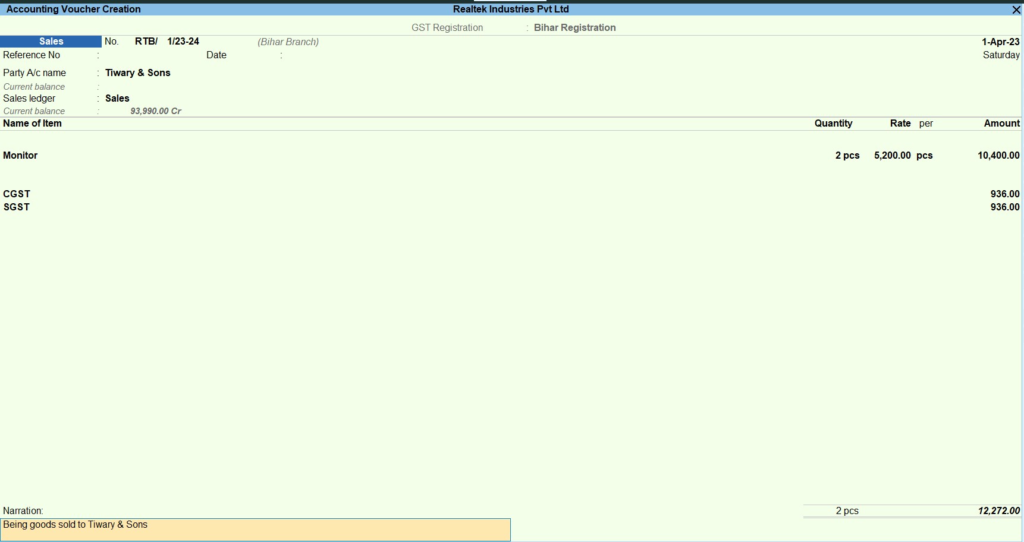
Sales Voucher for your Bihar branch.
Key Takeaway
Multi GSTIN in TallyPrime allows businesses of all sizes to effectively manage the complexities of operating across multiple states or regions.
With Multi GSTIN Management, businesses can efficiently handle diverse tax requirements, inter-branch transactions, and cross-border operations.
- It reduces errors in calculation.
- They are filing returns on time.
- Ultimately better control over financial operations.
TallyPrime is a powerful tool and offers a user-friendly interface. It makes it easier for businesses to stay compliant, and make informed decisions. The efficiency of business increases and now they are focusing on what truly matters – growing their business and serving their customers.
Looking for more information you can check TallyPrime.
FAQ
1. How will you create a sales invoice with multiple GST rates in the tally?
Following are the steps on how to create a sales invoice with multiple GST rates in Tally:
- Go to Gateway of Tally > Accounting Vouchers > F8: Sales.
- Press Ctrl+H (Change mode) > select Accounting Invoice.
- Enter the customer details.
- Select the items to be sold.
- For each item, enter the quantity, unit price, and GST rate.
- Press A: Tax Analysis to view the GST breakup of the invoice.
- Press Enter to save the invoice.
2. Can I configure a common voucher number across GSTIN for any specific Voucher type?
Yes, you can configure a common voucher number across GSTIN for any specific voucher type in Tally, follow these steps:
- Go to Gateway of Tally > F12: Configure > Voucher Entry.
- Select the voucher type for which you want to configure the common voucher number.
- In the Voucher Numbering section, select “Automatic” and enable “Use advanced configuration”.
- In the Prefix and Suffix fields, enter the prefix and suffix that you want to use for the voucher numbers.
- Press Ctrl+A to save the changes.
Once you have configured the common voucher number, all vouchers of the selected type will be assigned the same number, regardless of the GSTIN.
3. Can I generate branch-wise, financial reports like Balance sheets and Profit and Loss, etc.?
Yes, you can generate branch-wise financial reports like Balance sheets and Profit and Loss in Tally. To do this, you need to follow these steps:
- Go to Gateway of Tally > Display > Reports > Financial Statements.
- Select the report that you want to generate.
- In the Filters section, select “Branch” and enter the name of the branch for which you want to generate the report.
- Press Enter to generate the report.
The report will be generated for the selected branch only. You can also generate the report for multiple branches by selecting the branches in the Filters section.
4. How to create new GST registrations in Tally Prime Multi GSTIN?
These are the steps to create new GST registrations in Tally Prime Multi GSTIN:
- Go to Gateway of Tally > F11: Features > Enable Goods and Service Tax (GST) > Create.
- In the GST Registration Details screen, enter the following details:
- GSTIN/UIN
- State
- Address
- Registration Type
- Periodicity of Return Filing
- Place of Supply
- e-Invoice and e-Way Bill Applicability
- Reconciliation Configuration
- LUT/Bond Details, as applicable
- Press Enter to save the GST registration.
You can also create multiple GST registrations at the same time by entering the details for each registration in a separate row.
5. While raising the GST invoice, can the system pick up the address w.r.t the company address according to GSTIN?
Yes, the system can pick up the address w.r.t the company address according to GSTIN in Tally Prime Multi GSTIN. To do this, you need to enable the “Multi Address Option” in the GST Registration Details screen.
Here are the steps on how to do it:
- Go to Gateway of Tally > F11: Features > Enable Goods and Service Tax (GST) > Create.
- In the GST Registration Details screen, select the “Multi Address Option” checkbox.
- Press Enter to save the GST registration.
Once you have enabled the “Multi Address Option”, you can select the default billing address for the company in the Company Details screen.
Here are the steps on how to do it:
- Go to Gateway of Tally > F12: Configure > Company Details.
- In the Billing Address section, enter the default billing address for the company.
- Press Enter to save the changes.
When you raise a GST invoice, the system will automatically pick up the default billing address for the company, if the GSTIN of the customer matches the GSTIN of the company.
6. How do I add the GST registration details of other states or branches in Tally Prime?
Steps on how to add the GST registration details of other states or branches in Tally Prime:
- Go to Gateway of Tally > F11: Features > Enable Goods and Service Tax (GST) > Create.
- In the GST Registration Details screen, enter the following details:
- GSTIN/UIN
- State
- Address
- Registration Type>
- Periodicity of Return Filing
- Place of Supply
- e-Invoice and e-Way Bill Applicability
- Reconciliation Configuration
- LUT/Bond Details, as applicable
- Press Enter to save the GST registration.
Once you have created the GST registration, you can set it as the default GST registration for a particular voucher type.
Here are the steps on how to do it:
- Go to Gateway of Tally > F12: Configure > Voucher Entry.
- Select the voucher type for which you want to set the default GST registration.
- In the GST Registration section, select GST registration from the drop-down list.
- Press Enter to save the changes.
When you create a voucher of the selected type, the system will automatically use the default GST registration
7. Can I deactivate a specific GST registration of a specific state or branch in case of suspension or surrender in Tally Prime?
Yes, you can deactivate a specific GST registration of a specific state or branch in case of suspension or surrender in Tally Prime. To do this, you need to follow these steps:
- Go to Gateway of Tally > F11: Features > Enable Goods and Service Tax (GST) > Manage GST Registrations.
- In the GST Registrations screen, select the GST registration that you want to deactivate.
- Press Ctrl+D (Deactivate).
- In the confirmation message, select the reason for deactivation.
- Press Enter to deactivate the GST registration.
Once you have deactivated the GST registration, it will no longer be available for use in Tally Prime.
8. When multi-GST exports are happening simultaneously the credentials are changed very often how is it handled?
When multi-GST exports are happening simultaneously and the credentials are changed very often, Tally Prime will prompt you to enter the credentials for the respective GSTIN number. If you are exporting to multiple GSTIN numbers, you will need to provide the credentials one by one.
Here are the steps on how to do it:
- When you start the export process, Tally Prime will prompt you to enter the credentials for the first GSTIN number.
- Enter the credentials and press Enter.
- Tally Prime will export the data for the first GSTIN number.
- If you are exporting to multiple GSTIN numbers, Tally Prime will prompt you to enter the credentials for the next GSTIN number.
- Repeat steps 2-4 until you have entered the credentials for all the GSTIN numbers.
Once you have entered the credentials for all the GSTIN numbers, Tally Prime will export the data for all the GSTIN numbers simultaneously.
9. Can we file GSTR1 and GSTR3b returns directly from Tally Prime?
Yes, you can file GSTR1 and GSTR3B returns directly from Tally Prime. To do this, you need to follow these steps:
- Generate the GSTR1 or GSTR3B return in Tally Prime.
- Export the generated return in JSON format.
- Upload the JSON file to the GST portal.
Here are some additional points to keep in mind:
- You can generate the GSTR1 or GSTR3B return in Tally Prime by going to Gateway of Tally > F11: Features > Enable Goods and Service Tax (GST) > Generate GSTR1/GSTR3B.
- You can export the generated return in JSON format by going to Gateway of Tally > F11: Features > Enable Goods and Service Tax (GST) > Export GSTR1/GSTR3B.
- You can upload the JSON file to the GST portal by going to the GST portal and clicking on the “File Return” tab.
10. If the creditor’s customer has three branches we need to maintain an all-in-one account ledger is it possible?
Yes, it is possible to maintain all three branches of the creditor’s customer in one account ledger in Tally Prime. To do this, you can create a ledger for the creditor’s customer and then create three sub-ledgers for each branch.
Here are the steps on how to do it:
- Go to Gateway of Tally > Accounts Info > Ledgers > Create.
- In the Ledger Creation screen, enter the following details:
- Name: Enter the name of the creditor’s customer.
- Group: Select the group for the ledger.
- Press Enter to save the ledger.
- Create three sub-ledgers for each branch of the creditor’s customer.
- Name: Enter the name of the branch.
- Group: Select the group for the sub-ledger.
- Under Select the parent ledger for the sub-ledger.
- Maintain balances bill-by-bill: Select this checkbox if you want to maintain separate balances for each branch.
- Press Enter to save the sub-ledgers.
Once you have created the ledgers and sub-ledgers, you can enter the transactions for each branch in the respective sub-ledger.
11. What if my customer is operating from two states with two GSTIN numbers? Can we have a single ledger and maintain the single ledger?
Yes, you can have a single ledger and maintain the single ledger for your customer. If they are operating from two states with two GSTIN numbers in Tally Prime. Follow these steps to perform it:
- Go to Gateway of Tally > Accounts Info > Ledgers > Create.
- In the Ledger Creation screen, enter the following details:
- Name: Enter the name of the customer.
- Group: Select the group for the ledger.
- Press Enter to save the ledger.
- In the Ledger Details screen, enter the following details for each GSTIN number:
- GSTIN/UIN: Enter the GSTIN number.
- State: Enter the state where the GSTIN is registered.
- Press Enter to save the details.
Once the details of both GSTIN numbers are entered. You can enter the transactions for the customer in the single ledger.

Debjit Chakraborty
Certification : Certified Microsoft Excel Expert and Tally Profession: Ms Excel, TallyPrime Trainer Organization: Corporate Trainer – Technical Quality Assurance at “ICA Edu Skills Pvt. Ltd".
Industry Experience :Expert of MS Office and Tally, with over 16+ years of experience, trained more than 7,000+ individuals and Delivered Master Classes for over 100+ trainers of Excel and Tally. Mr. Debjit Chakraborty has a rich experience in training for over 16+ years. He has trained over 7,000+ students and over 100+ trainers of Excel and Tally.
Linkedin Profile:https://in.linkedin.com/in/debjit-chakraborty-873b6887