
Ways To Handle Purchase Entry In Tally Prime
Purchase entry in Tally Prime is an important concept. This article can prove to be a great solution to you if you have confusion regarding the process to handle the purchase entry in Tally Prime.
There are some easy processes to handle all the purchase entries in Tally Prime. Purchase entry in Tally Prime is a fundamental process for recording business transactions related to acquiring goods or services. It ensures accurate tracking of inventory, expenses, and tax liabilities.
In Tally Prime, purchase entries are streamlined, allowing users to efficiently document transactions, whether for cash or credit purchases. The software supports various voucher types, such as Purchase Voucher, to record these transactions with details like supplier information, item quantities, rates, and applicable taxes (e.g., GST, VAT).
Users can also manage additional costs, discounts, and inventory updates seamlessly. Tally Prime’s user-friendly interface simplifies data entry, reduces errors, and ensures compliance with accounting standards.
Table of Contents
- What Is The Purchase Entry In Tally Prime?
- Key Points About Purchase Entry In Tally Prime
- Steps To Record Purchase Entry In Tally Prime
- How To Account For An Increase In Purchase Value?
- Method-1 Modify The Original Debit Note(For Errors And Correction)
- Method-2 Create A Journal Voucher For Non-Inventory Adjustments or Additional Charges
- Method-3 Create A Credit Note (If Supplier Issues Additional Liability)
- How To Post Purchase Entry In Tally Prime
- Shortcut Key For Purchase Entry In Tally Prime
- How To Delete Purchase Return Entry In Tally Prime
- Final Takeaway
What Is The Purchase Entry In Tally Prime?
Purchase entry in Tally Prime is the process of recording transactions related to the acquisition of goods or services for a business. It is a critical function for maintaining accurate financial and inventory records. In Tally Prime, purchase entries are recorded using the Purchase Voucher, which captures essential details such as supplier information, item quantities, rates, taxes (e.g., GST, VAT), discounts, and additional costs like freight or packing charges.
Key Points About Purchase Entry In Tally Prime
There are certain Key points about Purchase entry in Tally Prime that most of us are unaware of. So, let’s explore those points to have a clear insight to it one after the other.
- Purpose : Records transactions for acquiring goods or services, ensuring accurate financial and inventory tracking.
- Voucher Type : Primarily uses Purchase Voucher (F9) for cash or credit purchases; other vouchers like Journal may be used for specific cases.
- Inventory Integration: Automatically updates stock levels for inventory items, reflecting real-time stock status.
- Tax Compliance: Supports GST, VAT, or other taxes, allowing input tax credit tracking and compliance with tax laws.
- Supplier Details: Captures supplier information under Sundry Creditors, facilitating payable management.
- Flexible Entries:
- Cash Purchase: Immediate payment transactions.
- Credit Purchase: Deferred payment, recorded as liabilities.
- Taxable/Non-Taxable: Handles GST-applicable or exempt purchases.
- Interstate/Intrastate: Categorizes based on supplier location for GST purposes.
- Additional Costs: Allows inclusion of expenses like freight, insurance, or discounts, allocated to items or ledgers.

Steps To Record Purchase Entry In Tally Prime
There are certain steps to record the purchase entry in Tally Prime that you must be well aware of while meeting your goals with complete ease. Some of the key steps to consider here are as follows:-
1. Enable Debit Note
- Navigate to Gateway of Tally > F11: Features > Accounting Features.
- Activate the option to use Debit/Credit Notes by setting it to Yes.
- Enable the use of Debit Notes for recording Purchase Returns.
2. Create Debit Note
- Access Gateway of Tally > Accounting Vouchers, press Ctrl+F9 to open a Debit Note.
- Select the supplier’s ledger.
- Choose the appropriate purchase or expense ledger.
- Enter item details for inventory-related returns or the amount for non-inventory returns.
- Specify the reason for the return (e.g., defective goods).
- Save the transaction.
3. Inventory Adjustment( If Applicable)
When returning stock items, Tally Prime automatically updates the inventory by decreasing the quantity of the returned goods, which is an essential step in managing purchase entries.
4. GST Impact(If Applicable)
- For purchases involving GST, the debit note will reverse the input tax credit for returned goods.
- Ensure accurate GST details are entered in the debit note.
5. Accounting & Inventory Impact
- In a purchase return, the supplier’s (creditor’s) account is debited to decrease the liability, the purchase account is credited.
- Inventory quantities are reduced for stock items.
- The input tax credit for GST is reversed for the returned goods.
How To Account For An Increase In Purchase Value?
To account for an increase in purchase value in Tally Prime (e.g., due to additional costs like freight, taxes, or price adjustments after the original purchase entry), you can either modify the original purchase voucher or create a separate journal or debit note voucher to record the additional amount.
This process ensures the accounting, inventory, and GST impacts (if applicable) are accurately reflected, aligning with the principles discussed in your previous queries about purchase entries and returns.
1. Determine The Nature Of Increase
- Identify why the purchase value increased (e.g., additional freight, customs duty, price hike by supplier, or extra GST).
- Decide whether to amend the original purchase voucher or record the increase separately (based on whether inventory or GST needs adjustment).
2. Option 1: Modify The Original Purchase Voucher
Access the Voucher:
- Go to Gateway of Tally > Display More Reports > Day Book or Ledger Vouchers.
- Locate the original purchase voucher (press Enter on the relevant date or ledger).
Edit the Voucher:
- Press Alt+Enter to open the voucher in edit mode.
- Update the purchase amount, inventory details (e.g., rate or quantity), or add additional ledgers (e.g., Freight Charges under Indirect Expenses).
- If GST applies, adjust the GST Ledgers (e.g., CGST, SGST, or IGST) to reflect the increased taxable value.
Save Changes:
- Press Ctrl+A to save the modified voucher.
- Tally updates the supplier’s ledger, purchase ledger, inventory, and GST input tax credit accordingly.
3. Option 2: Record Additional Cost Via Journal Voucher
Access Journal Voucher:
- Go to Gateway of Tally > Accounting Vouchers > press F7 for Journal.
Debit the Relevant Ledger:
- Debit the Purchase Ledger (e.g., Purchase A/c) or an expense ledger (e.g., Freight Charges) for the additional cost.
- If inventory is affected (e.g., higher cost per unit), ensure the ledger is inventory-enabled.
Credit the Supplier or Expense Ledger:
- Credit the Supplier’s Ledger (under Sundry Creditors) if the additional amount is owed to the supplier.
- Alternatively, credit a Cash/Bank Ledger if paid immediately, or another liability ledger if applicable.
GST Adjustment (if applicable):
- If the increase includes GST, debit the CGST/SGST/IGST Ledgers for the additional input tax credit.
- Ensure the supplier’s GSTIN and place of supply are correctly set.
Narration:
- Add a note (e.g., “Additional freight charges for purchase invoice #123”).
Save:
- Press Ctrl+A to save the journal entry.
4. Option 3: Use Debit Note For Supplier Adjustment
Access Debit Note:
- Go to Gateway of Tally > Accounting Vouchers > press Ctrl+F9 for Debit Note.
Select Supplier Ledger:
- Choose the supplier’s ledger (e.g., under Sundry Creditors) to debit, increasing the liability.
Select Purchase/Expense Ledger:
- Choose the Purchase Ledger or a specific expense ledger (e.g., Freight Charges) to debit for the additional cost.
Inventory Adjustment (if applicable):
- If the increase affects stock value (e.g., higher unit cost), select the Stock Item and update the Rate or Amount.
- Tally adjusts the inventory value accordingly.
GST Details (if applicable):
- Add GST Ledgers (e.g., CGST, SGST) to account for additional input tax credit.
Narration:
- Enter the reason (e.g., “Supplementary invoice for price increase”).
Save:
- Press Ctrl+A to save.
5. Verify The Impact
- Ledger Vouchers: Check the supplier’s ledger to confirm the increased liability.
- Stock Summary: If inventory is affected, verify the updated stock value or quantity in Display More Reports > Stock Summary.
- GST Reports: If GST is involved, check GSTR-3B or GSTR-2B to ensure the input tax credit is updated.
- Purchase Register: Confirm the total purchase value reflects the increase.
Method-1 Modify The Original Debit Note(For Errors And Correction)
There are some simple steps that you need to follow for modifying the original debit note. Some of the key aspects that you should follow are as under.
- Identify Errors: Review the original debit note for inaccuracies, such as incorrect amounts, quantities, dates, tax calculations, or recipient details.
- Create a Revised Debit Note: Issue a new debit note clearly labeled as “Revised” or “Amended” to distinguish it from the original.
- Reference the Original: Include the original debit note number and date to link the correction to the initial document.
- Detail Corrections: Specify the errors corrected (e.g., “Corrected total amount from $1,000 to $900 due to incorrect quantity”).
- Update Relevant Fields: Adjust only the incorrect fields while keeping the format consistent with the original for clarity.
- Notify the Recipient: Inform the recipient (via email or letter) about the revised debit note, explaining the changes and attaching the new document.
- Update Records: Void the original debit note in your accounting system and record the revised one to ensure accurate bookkeeping.
- Ensure Compliance: Verify that the revised debit note meets local tax and accounting regulations (e.g., GST in India, VAT in the EU, or other requirements).
Method-2 Create A Journal Voucher For Non-Inventory Adjustments or Additional Charges
Creating a journal voucher for non-inventory adjustments or additional charges is a common accounting practice to record transactions that don’t involve physical inventory, such as correcting errors, recording additional charges (e.g., freight, taxes, or penalties), or making non-inventory-related adjustments (e.g., write-offs, accruals).
- Identify the Purpose: Determine the reason for the journal voucher (e.g., additional charges like freight, correction of an error, or non-inventory adjustments like bad debt write-off).
- Gather Details: Collect necessary information, including:
- Date of the transaction.
- Accounts affected (e.g., expense, revenue, liability, or asset accounts).
- Amounts to be debited or credited.
- Narration or description explaining the adjustment.
- Reference to related documents (e.g., invoice, debit note, or contract).
- Follow Double-Entry Accounting: Ensure the total debits equal total credits to maintain the accounting equation (Assets = Liabilities + Equity).
- Select Accounts: Choose the appropriate ledger accounts based on the nature of the adjustment or charge (e.g., “Freight Expense” or “Accounts Receivable”).
- Create the Journal Voucher:
- Include a unique voucher number for tracking.
- Specify the date, accounts, debit/credit amounts, and narration.
- If applicable, include tax details (e.g., GST, VAT) for additional charges.
- Verify and Approve: Review the journal voucher for accuracy and obtain necessary approvals as per your organization’s policy.
- Record in Accounting System: Enter the journal voucher into your accounting software (e.g., QuickBooks, Tally, SAP) or manual ledger.
- Maintain Documentation: Attach supporting documents (e.g., emails, contracts, or debit notes) for audit purposes.
- Ensure Compliance: Adhere to local accounting standards (e.g., GAAP, IFRS) and tax regulations (e.g., GST in India, VAT in the EU).
Method-3 Create A Credit Note (If Supplier Issues Additional Liability)
Creating a credit note when a supplier issues additional liability (e.g., additional charges, taxes, or corrections that increase the supplier’s liability to the buyer) is a standard accounting practice to adjust the original invoice or transaction.
- Understand the Additional Liability: Identify the nature of the additional liability (e.g., additional charges like freight, taxes, or penalties imposed by the supplier, or corrections to an overcharged invoice).
- Gather Details: Collect key information, including:
- Original invoice number and date.
- Supplier and buyer details (e.g., name, address, tax ID/GSTIN).
- Amount of the additional liability and the credit to be issued.
- Reason for the credit note (e.g., to offset additional charges or correct an error).
- Supporting documents (e.g., supplier’s debit note, agreement, or email).
- Determine the Credit Amount: Calculate the amount to be credited, including any applicable taxes (e.g., GST, VAT) to adjust the buyer’s liability accurately.
- Prepare the Credit Note:
- Assign a unique credit note number.
- Clearly state it’s a credit note and reference the original invoice or supplier’s debit note.
- Include a narration explaining the reason for the credit.
- Specify accounts affected (e.g., Accounts Payable, Tax Input Credit).
- Ensure Compliance: Include mandatory fields required by local tax laws (e.g., GSTIN and HSN/SAC codes in India, VAT details in the EU).
- Notify the Supplier: Send the credit note to the supplier with a cover letter or email explaining the adjustment.
- Record in Accounting System: Update your accounting records (e.g., in QuickBooks, Tally, or SAP) to reflect the credit note, reducing the supplier’s payable amount.
- Maintain Documentation: Retain copies of the credit note and related documents (e.g., supplier’s debit note) for audit purposes.
Few Tally related topics for your knowledge
- Company Creation In Tally Prime: From Beginning To End
- BRS In Tally Prime: Purpose, Format, And Method Of Preparation
- Purchase Order In Tally Prime: Manage Inventory, And Expenses
- How To View Balance Sheet In Tally Prime
- Payroll In TallyPrime: Overview, Elements, Procedure
- Tally Prime Vs Tally ERP 9: Which One Is Better
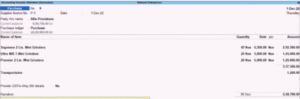
How To Post Purchase Entry In Tally Prime
There are some simple methods available to post purchase entries in Tally Prime. Some of the key methods to follow here are as under. Posting a purchase entry in Tally Prime is a straightforward process used to record the purchase of goods or services, including inventory and non-inventory items, with or without taxes (e.g., GST, VAT).
1. Ensure Prerequisites
- Ledgers Created: Ensure supplier ledger (under “Sundry Creditors”), purchase ledger (under “Purchase Accounts”), and tax ledgers (e.g., Input CGST, Input SGST/IGST) are set up.
- Inventory Setup: If purchasing inventory items, ensure stock items are created with appropriate units and GST details (if applicable).
- GST/VAT Compliance: Verify that the company and supplier GSTINs are configured in Tally Prime (for India) or VAT details (for other regions).
- Company Features: Enable GST/VAT and inventory management in Tally Prime (Gateway of Tally > then click on F11: Features > Statutory & Taxation > Enable GST: Yes).
2. Access Purchase Voucher
- From the Gateway of Tally, go to Vouchers (or press F9).
- Select Purchase Voucher (or press F10 to switch to Purchase mode if in Accounting Voucher screen).
3. Enter Purchase Details
- Date: Enter the transaction date (e.g., 09/09/2025).
- Voucher Number: Tally auto-generates this, or you can manually enter it if customized.
- Party A/c Name: Select the supplier’s ledger (e.g., “Supplier XYZ”) from Sundry Creditors. Enter supplier details (e.g., GSTIN, address) if prompted.
- Purchase Ledger: Select the appropriate purchase ledger (e.g., “Purchase – Local” or “Purchase – Interstate”).
- Inventory Details (if applicable):
- Select stock items, enter quantity, rate, and any discounts.
- Tally calculates the total amount automatically.
- Non-Inventory Details: For non-inventory purchases (e.g., freight, services), select the relevant expense ledger (e.g., “Freight Charges”).
- Tax Details: For GST/VAT:
- Select tax ledgers (e.g., Input CGST, Input SGST, or Input IGST).
- Enter taxable amount and tax rate (e.g., 5% CGST + 5% SGST).
- Narration: Add a description (e.g., “Purchase of goods from Supplier XYZ vide Invoice INV-123 dated 09/09/2025”).
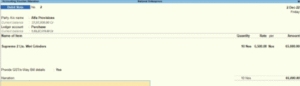
4. Verify & Save
- Check that debits equal credits (Tally ensures this automatically).
- Press Ctrl+A or Enter to save the voucher.
- If GST is enabled, Tally will update GSTR-2 (Input Tax Credit) reports automatically.
5. Handle Additional Charges
If the purchase includes additional charges (e.g., freight, as in your credit note query), add them as separate ledger entries in the voucher:
- Select a ledger like “Freight Charges” and allocate the amount.
- Apply taxes (e.g., GST on freight) if applicable.
If the supplier issued a debit note for additional liability (as in your prior query), record it as a separate purchase entry or adjust it via a journal/credit note later.
6. Link To Credit Note If Available
If the supplier’s additional liability (e.g., freight charges) led to a credit note (as per your previous query), ensure the purchase entry reflects the original invoice amount. The credit note will be recorded separately to reduce the supplier’s liability:
- Go to Gateway of Tally > Vouchers > Credit Note (or press Alt+F8).
- Reference the original invoice and supplier’s debit note (e.g., DN-2025-001).
- Debit the supplier’s ledger (e.g., “Supplier XYZ”) and credit the relevant expense/tax ledger (e.g., “Freight Charges” or “Input GST”).
- Save the credit note to adjust the Accounts Payable.
7. Check Reports
- Verify the purchase in Gateway of Tally > Display More Reports > Account Books > Purchase Register.
- For GST, check Display More Reports > GST Reports > GSTR-2 to ensure Input Tax Credit is correctly recorded.
- Confirm the supplier’s balance in Ledger Accounts > Supplier XYZ.
Shortcut Key For Purchase Entry In Tally Prime
There are several shortcut keys for purchase entry in Tally Prime. So, let’s explore the shortcut keys in Tally Prime to meet your goals with ease.
| Action | Shortcut Keys | Description |
|---|---|---|
| Open Purchase Voucher | F9 | Opens the Purchase Voucher screen to record a purchase entry (e.g., for goods, services, or additional charges). |
| Switch Voucher Type | F10 | Switches between voucher types (e.g., from Journal to Purchase) if you’re in the Vouchers menu. |
| Save Purchase voucher | Ctrl A | Accepts and saves the purchase entry after entering details like supplier, purchase ledger, and taxes. |
| Add New Ledger Item | Alt C | Creates a new ledger (e.g., supplier or purchase ledger) or stock item during voucher entry. |
| Toggle Party Details | F12 | Opens configuration settings to customize fields (e.g., enable GSTIN, bill-wise details) in the voucher. |
| Bill Wise Details | F5 | Enables bill-wise details for tracking supplier payments against the purchase invoice. |
| GST details | Ctrl+ O | Opens GST details for entering tax-related information (e.g., GSTIN, HSN/SAC codes) if applicable. |
| Narration | Ctrl+ R | Allows editing or adding a narration for the purchase entry (e.g., referencing a supplier’s debit note). |
| Cancel Voucher | Ctrl + D | Deletes or cancels the current purchase voucher entry before saving. |
| View Purchase Register | Alt +D >P | From Gateway of Tally, navigates to Display > Account Books > Purchase Register to view purchase entries. |
| Create Credit Note | Alt + F8 | Opens the Credit Note voucher (relevant if issuing a credit note for supplier’s additional liability, as per your prior query). |
| Create Journal Voucher | F7 | Opens the Journal Voucher screen (useful for non-inventory adjustments linked to your prior query). |
How To Delete Purchase Return Entry In Tally Prime
Deleting a Purchase Return Entry (also known as a Debit Note in Tally Prime, used to record returns of goods or adjustments for supplier liabilities) in Tally Prime requires careful steps to maintain accurate accounting records and comply with regulations, such as GST in India.
1. Locate The Purchase Return Entry
- From the Gateway of Tally, go to Display More Reports > Account Books > Purchase Register (or press Alt+D > P).
- Alternatively, go to Vouchers (press F10) and select Debit Note (press Alt+F6) to view the list of debit notes (purchase returns).
- Find the specific purchase return entry by date, voucher number, or supplier name. For example, if it’s related to your prior debit note query (e.g., DN-2025-001), use its voucher number.
2. Open The Debit Note
- In the Purchase Register or Debit Note Register, select the entry by highlighting it and pressing Enter to open the voucher in edit mode.
- Verify details (e.g., supplier name, amount, tax, or narration) to ensure you’re deleting the correct entry.
3. Delete The Entry
- With the debit note open, press Ctrl+D (the shortcut for deleting a voucher in Tally Prime).
- Tally will prompt for confirmation: “Delete? Yes or No.”
- Select Yes (press Y) to confirm deletion.
- The entry will be removed from the system.
4. Check The Impact On Ledgers
After deletion, verify the supplier’s ledger:
- Go to Gateway of Tally > Display More Reports > Account Books > Ledger > Select Supplier (e.g., Supplier XYZ).
- Ensure the purchase return amount (e.g., credit to supplier ledger) is reversed.
For GST transactions (relevant in India):
- Check GST Reports > GSTR-2 (Input Tax Credit) to confirm the tax credit from the debit note is removed.
- Ensure the deletion aligns with GST compliance (e.g., no Input Tax Credit was claimed, or reverse it if claimed).
5. Handle Linked Transaction
If the purchase return was linked to a purchase entry (e.g., your prior query about purchase entry with F9), ensure the original purchase invoice is not affected unless required.
If a Credit Note was issued (per your prior query about supplier liability), check if it needs adjustment or deletion:
- Go to Vouchers > Alt+F8: Credit Note and verify if the credit note (e.g., CN-2025-002) was linked to the debit note.
- If necessary, delete or adjust the credit note using Ctrl+D in the Credit Note voucher screen.
If a Journal Voucher (per your prior query with F7) was created for non-inventory adjustments tied to the purchase return, review and delete it if needed.
6. Maintain Audit Trail
- Document the reason for deletion (e.g., “Deleted Debit Note DN-2025-001 due to incorrect amount entered”).
- Retain a backup of the data before deletion (Gateway of Tally > Alt+F3 > Backup).
- If required for audit (e.g., GST in India), inform the supplier about the deletion and issue a corrected debit note if necessary.
7. GST/ VAT compliance
- If the purchase return involves GST (e.g., Input CGST/SGST reversed), ensure the deletion is reflected in GSTR-2 or GSTR-3B filings.
- If the supplier issued a credit note in response, notify them to reverse it to avoid discrepancies in tax records.
- For non-GST scenarios, ensure the supplier’s ledger and accounting books are updated correctly.
Final Takeaway
Hence, these are some of the crucial facts that you need to take care of while you want to handle purchase entry in Tally Prime. However, you should not make your choices on the wrong end while meeting your requirements with ease.
You can share your views and opinions in our comment box. This will help us to know your take on this matter. Feel free to share your feedback with us while meeting your goals with ease.

- Get Hired Quickly: Top Tally Classes Online for High-Paying Jobs - July 10, 2026
- Accounting Courses Online with Certificate: Your 2026 Career Launchpad - July 3, 2026
- SAP FICO Career Guide for Freshers: How to Land Your First Job - June 26, 2026