
Trial Balance In Tally Prime: A Complete Guide For Beginners
A Trial Balance in Tally Prime is a crucial financial report that summarizes the balances of all ledger accounts at a specific point in time, ensuring the accuracy of bookkeeping by verifying that the total debits equal the total credits.
It serves as a foundation for preparing financial statements like the Balance Sheet and Profit & Loss Account. In TallyPrime, generating a Trial Balance is streamlined with its user-friendly interface and advanced features.
Users can access it via the “Gateway of Tally” under “Display More Reports” > “Trial Balance,” with options to customize views, such as detailed or condensed formats, and filter by date or group.
TallyPrime also allows drilling down into ledger details for quick error detection and correction. Its real-time data processing ensures accuracy, while features like export to Excel and GST compliance enhance its utility for businesses, making financial management efficient and reliable.
Table of Contents
- What Is Trial Balance In Tally?
- How To View Trial Balance In Tally Prime?
- How To Get Detailed Trial Balance In Tally Prime?
- Ways To Generate Receipt Note In Trial Balance
- Group Or Ledgerwise Trial Balance
- How To Access Trial Balance Report In Tally Prime?
- How To Import Trial Balance In Tally Prime?
- Final Takeaway
What Is Trial Balance In Tally?
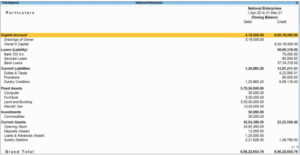
A Trial Balance in Tally Prime (both TallyPrime and Tally.ERP 9) is a financial report that lists the closing balances of all ledger accounts in a company’s books at a specific point in time. It ensures the accuracy of accounting records by verifying that the total of all debit balances equals the total of all credit balances, reflecting the double-entry bookkeeping principle.
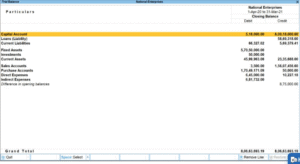
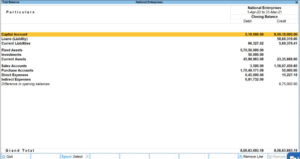
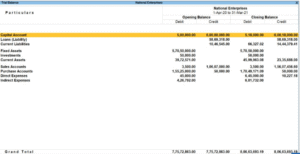
In Tally, the Trial Balance is accessed through the “Gateway of Tally” under “Display More Reports” > “Trial Balance.” It displays ledger accounts categorized by groups (e.g., Current Assets, Liabilities), with debit and credit columns. Users can view it in condensed or detailed formats, filter by date, or drill down into specific ledgers to check transactions. Tally’s real-time data processing ensures the report is accurate, helping businesses identify errors, reconcile accounts, and prepare financial statements like the Balance Sheet and Profit & Loss Account efficiently.
How To View Trial Balance In Tally Prime?
To view the Trial Balance in Tally Prime, follow these steps:
1. Open TallyPrime
Launch TallyPrime and select the company for which you want to view the Trial Balance.
2. Go To Gateway Of Tally
From the main screen, navigate to the Gateway of Tally.
3. Access Reports
Click on Display More Reports (or press D on the keyboard).
4. Select Trial Balance
Under the Account Books section, choose Trial Balance (or press T).
5. View The Trial Balance
The Trial Balance report will display, showing all ledger accounts with their debit and credit balances, grouped under categories like Current Assets, Liabilities, etc.
6. Customize The View
- Press F12 (Configure) to customize settings, such as showing opening balances, closing balances, or transactions. Trial Balance In TallyPrime can help you in meeting your needs with ease.
- Use Alt+F12 to filter by date range or specific ledgers.
- Press F5 to toggle between Detailed (shows all ledgers) and Condensed (shows group-wise summary) views.
7. Drill Down For Details
Click on any ledger or group to view detailed transactions or sub-ledgers for further analysis.
8. Export Or Print
Press Ctrl+E to export the Trial Balance to Excel or PDF, or Ctrl+P to print it.

How To Get Detailed Trial Balance In Tally Prime?
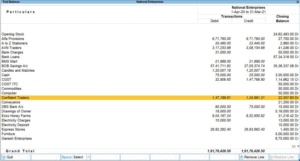
A Detailed Trial Balance in TallyPrime provides a comprehensive view of all ledger accounts, including individual ledgers under each group, with their respective debit and credit balances at a specific point in time.
Unlike the condensed view, which shows only group-wise summaries, the detailed view lists every ledger account, making it easier to analyze transactions, verify accuracy, and identify discrepancies. Below is a detailed step-by-step guide to generating and customizing a Detailed Trial Balance in TallyPrime:
1. Launch TallyPrime
- Open TallyPrime on your computer.
- From the Company Selection screen, select the company for which you want to generate the Trial Balance. Ensure the company’s books are up-to-date with all transactions entered.
2.Access The Gateway Of Tally
- Once the company is loaded, you’ll land on the Gateway of Tally, the main menu of TallyPrime. This is the starting point for accessing reports and other features.
3. Navigate To Display Reports
- In the Gateway of Tally, locate the Display More Reports option. You can either:
- Click on Display More Reports in the menu, or
- Press D on your keyboard to directly access the display menu.
- This opens a list of reporting options under Account Books and other categories.
4. Select The Trial Balance
- Under the Account Books section, select Trial Balance (or press T if using keyboard shortcuts).
- TallyPrime will load the Trial Balance report, which by default may appear in the Condensed view, showing only group-wise summaries (e.g., Current Assets, Current Liabilities).
5. Switched To Detail View
To view the Detailed Trial Balance:
- Press F5 on your keyboard, or
- Look at the right-side menu (the vertical toolbar) and click on the Detailed/Condensed option to toggle to Detailed.
The Detailed view expands the report to display all individual ledger accounts under each group, along with their debit and credit balances. For example, under the “Current Assets” group, you’ll see individual ledgers like “Cash,” “Bank Accounts,” or “Sundry Debtors” with their respective balances.
6. Customized The Detail Trial Balance
TallyPrime allows extensive customization to tailor the report to your needs. To configure the report:
- Press F12 (Configure) to open the configuration menu. Here, you can adjust:
- Show Opening Balances: Enable this to include opening balances for each ledger.
- Display Transactions: Display the number of transactions or transaction details for each ledger.
- Show Closing Balances: Ensure closing balances are shown (default setting).
- Groups/Ledgers: Choose whether to include specific groups or ledgers.
- Format Options: Select how amounts are displayed (e.g., in lakhs, crores, or with decimals).
- Press Alt+F12 (Filter) to apply filters, such as:
- Date Range: Specify a custom period (e.g., from April 1, 2025, to October 27, 2025).
- Specific Ledgers/Groups: Filter to show only certain ledgers or groups (e.g., only “Sundry Debtors” or “Bank Accounts”).
- Non-Zero Balances: Exclude ledgers with zero balances for a cleaner report.
- After applying configurations, the report updates automatically to reflect your preferences.
7. Drill Down For Indepth Analysis
The Detailed Trial Balance allows you to drill down into specific ledgers or groups for further details:
- Click on any ledger or group name (or use the Enter key) to view the Ledger Vouchers report, which lists all transactions for that ledger.
- From there, you can further drill down to individual vouchers (e.g., sales, payments) to verify or edit transactions.
- This feature is useful for identifying errors if the debit and credit totals in the Trial Balance don’t match.
8. Verify Accuracy
- In the Detailed Trial Balance, check that the total debit balance equals the total credit balance (displayed at the bottom of the report). If there’s a mismatch, it indicates an error in the accounting entries.
- Use the drill-down feature to trace discrepancies, such as incorrect postings, missing entries, or unbalanced vouchers.
9. Export Or Print Receipt
To share or archive the Detailed Trial Balance:
- Press Ctrl+E (Export) to save the report in formats like Excel, PDF, or XML. Choose the format and destination file path.
- Press Ctrl+P (Print) to generate a hard copy or configure print settings (e.g., paper size, orientation).
- You can also email the report directly from TallyPrime by selecting the email option in the export menu (requires email configuration).
Ways To Generate Receipt Note In Trial Balance
Imagine you purchased goods from a supplier and found them satisfactory upon receipt, prompting you to issue a Receipt Note. When the Receipt Note is recorded with a tracking number, it impacts the Trial Balance. To check this impact, navigate to Alt+G (Go To), type or select Trial Balance, and press Enter, or go to Gateway of Tally > Display More Reports > Trial Balance. Then, press F5 (Ledger-wise) to view the detailed ledger-wise report.

Group Or Ledgerwise Trial Balance
You can conveniently verify and adjust discrepancies in the Ledger’s opening balance using TallyPrime’s Trial Balance, which can be displayed by ledger groups. This allows you to switch from a ledger-wise report to a group-wise report effortlessly. To access the Trial Balance, press Alt+G (Go To), type or select Trial Balance, and press Enter. Press F5 to view the ledger-wise report and press F5 again to revert to the group-wise report. For detailed Trial Balance formats, press Alt+F5.
How To Access Trial Balance Report In Tally Prime?
To access the Trial Balance Report in TallyPrime, follow these detailed steps:
1. Launch TallyPrime:
- Open TallyPrime on your computer.
- Select the company for which you want to view the Trial Balance from the Company Selection screen. Ensure all transactions are up-to-date for accurate reporting.
2. Method 1: Using Gateway of Tally:
- From the Gateway of Tally (the main menu), navigate to Display More Reports:
- Click Display More Reports, or press D on your keyboard.
- In the Display More Reports menu, under Account Books, select Trial Balance:
- Click Trial Balance, or press T.
- The Trial Balance report will load, initially in the Condensed view, showing group-wise balances (e.g., Current Assets, Liabilities) with total debit and credit amounts.
3. Method 2: Using Go To Feature:
- For faster access, use the Go To feature:
- Press Alt+G (Go To) from any screen in TallyPrime.
- Type “Trial Balance” in the search bar.
- Select Trial Balance from the results and press Enter.
- This opens the Trial Balance report directly.
4. View And Customize The Report:
- Switch to Detailed View:
- By default, the report may show a group-wise summary. To view individual ledger balances, press F5 (or click Detailed/Condensed in the right-side menu) to toggle to the Detailed view, displaying all ledgers under each group.
- Configure Report Settings:
- Press F12 (Configure) to customize the report. Options include:
- Show Opening Balances: Include opening balances for ledgers.
- Display Transactions: Display transaction counts or details.
- Show Closing Balances: Show only closing balances (default).
- Format: Adjust amount display (e.g., with decimals or in lakhs/crores).
- Press Alt+F12 (Filter) to refine the report by:
- Date Range: Select a specific period (e.g., April 1, 2025, to October 27, 2025).
- Specific Groups/Ledgers: Show only selected ledgers or groups.
- Non-Zero Balances: Exclude ledgers with zero balances.
- Press F12 (Configure) to customize the report. Options include:
- Toggle Group-Wise/Ledger-Wise:
- Press F5 to switch between Detailed (ledger-wise) and Condensed (group-wise) views.
- Press Alt+F5 to access detailed formats or additional report options.
5. Drill Down For Analysis:
- Click on any ledger or group (or press Enter) to drill down into the Ledger Vouchers report, showing all transactions for that ledger.
- Further drill down to individual vouchers (e.g., sales, payments) to verify or edit entries, helping identify discrepancies if debit and credit totals don’t match.
6. Export Or Print:
- To export the report, press Ctrl+E and choose a format (e.g., Excel, PDF, XML).
- To print, press Ctrl+P and configure print settings.
- You can also email the report directly (requires email setup in TallyPrime).
Few related topics for your knowledge
- Company Creation In Tally Prime: From Beginning To End
- BRS In Tally Prime: Purpose, Format, And Method Of Preparation
- Chart Of Accounts In Tally Prime: A Complete Overview
- Ways To Handle Purchase Entry In Tally Prime
- Payroll In TallyPrime: Overview, Elements, Procedure
- Tally Prime Vs Tally ERP 9: Which One Is Better
How To Import Trial Balance In Tally Prime?
Importing a Trial Balance in Tally Prime allows you to transfer ledger balances from an external source (e.g., Excel, CSV, or XML) into TallyPrime to update your company’s financial records. This is useful for migrating data from another accounting system or updating opening balances.
1. Prepare The XML File:
- Create an XML file with Trial Balance data using Tally’s XML structure. You can:
- Use third-party tools or Tally’s Excel to Tally utilities to convert Excel/CSV to XML.
- Refer to Tally’s XML schema (available via Tally Developer or https://tallysolutions.com).
2. Access The Import Option
- From Gateway of Tally, go to Alt+Y (Data) > Import > Masters.
- Alternatively, press Alt+G (Go To), type “Import Masters,” and press Enter.
3. Select And Import The XML File:
- In the Import screen:
- Set File Type to XML.
- Click Browse and select the XML file (e.g., C:\TallyData\TrialBalance.xml).
- Choose import behavior:
- Create: Add new ledgers if they don’t exist.
- Modify: Update existing ledger balances.
- Combine: Merge new and existing data.
- Press Enter to start the import.
- TallyPrime validates the file and imports the data, showing an Import Summary with details of successful imports or errors.
4. Verify In Trial Balance
- Go to Gateway of Tally > Display More Reports > Trial Balance (or press Alt+G, type “Trial Balance,” press Enter).
- Press F5 for the Detailed view to see individual ledger balances (e.g., Sundry Debtors: $50,000 Dr, Sundry Creditors: $30,000 Cr).
- Check that debit and credit totals match to confirm data integrity.
- Drill down (press Enter on a ledger) to verify transactions or balances.
Final Takeaway
Hence, these are some of the crucial steps that you need to follow from your end while you want to maintain the Trial Balance in Tally Prime. So, you must follow the steps to have a better idea into it.
You can share your views and opinions in our comment box this will help us to know your take in our comment box. Your views are valuable to us. So share your opinion properly in this regard.

- Get Hired Quickly: Top Tally Classes Online for High-Paying Jobs - July 10, 2026
- Accounting Courses Online with Certificate: Your 2026 Career Launchpad - July 3, 2026
- SAP FICO Career Guide for Freshers: How to Land Your First Job - June 26, 2026