
3 Smart Ways to Speed Up Data Entry and Processing in Excel
Data entry and processing in Excel can take more time and effort than people expect. Professionals have to spend hours typing and cleaning data before they can even start to analyze it. However, Excel itself doesn’t inherently support this slow pace.
In fact, Excel is designed to handle hefty amounts of data quickly. It has a lot of features that many professionals might not even know. These features can minimize manual typing, automate patterns, and speed up calculations. Correctly using them can cut time and effort to a noticeable margin while also improving accuracy.
In this article, I’ll explain some of the most useful ways that can help accelerate data entry and processing in Excel. So, stay with me until the end!
Table of Contents
Ways to Speed Up Data Entry and Processing in Excel
Speeding up in Excel isn’t about rushing through the work; it’s about reducing the steps of those repetitive and time-consuming tasks that Excel can handle for you.
Data entry is slow when professionals rely too much on manual inputs or just copy-paste actions. These may feel familiar, but quietly drain time and energy while also costing accuracy. The methods I’ve come up with may help you solve these problems.
Each method is proven and easy to apply in everyday Excel workflows. Together, they save you time and reduce errors. As a result, you can stay focused on tasks that really matter. Now, let’s explore the methods one by one!

Use Keyboard Shortcut Keys
Data entry becomes too slow when professionals rely just on manual keyboard typing or mouse clicks. This makes even simple tasks feel slow. A keyboard is not just for manual typing. It has a lot of shortcut keys that become useful while working in Excel. Some of the most helpful are as follows.
- Ctrl + Enter
This key helps when you have to fill multiple cells with the same entry, e.g., labels, dates, or categories. Instead of copying and pasting entries one by one, use it to save time.
- Ctrl + D
It can be used to copy the same values or formula downwards. It helps you maintain consistent formulas across columns.
- Ctrl + Shift + Arrow Keys
This key is very helpful for fast navigation and selection in large data ranges. Rather than dragging a mouse, which consumes considerable time, use this key for formatting and validations across entire datasets.
- Ctrl + Arrow Keys
With this key, you can directly jump to the last filled cell in any direction you want. It’s very useful when reviewing or editing long spreadsheets.
- Alt + =
This key quickly inserts the SUM function, reducing the need to type formulas from scratch during data aggregation.
Apply Efficient Formulas
Excel allows the application of formulas to speed up data entry and processing. Many professionals are unaware of them. These functions can replace manual steps and heavy calculations that save time and reduce the chances of errors. The most efficient ones are as follows:
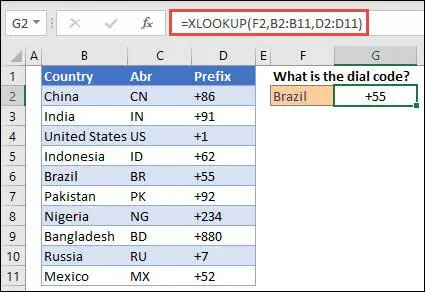
XLOOKUP
This function can help you find value in a specific column or row and return the corresponding value from another. You have to give the function to Excel like this: XLOOKUP(what_to_find, where_to_find_it, what_to_return). This picture can be used to understand the XLOOKUP function:
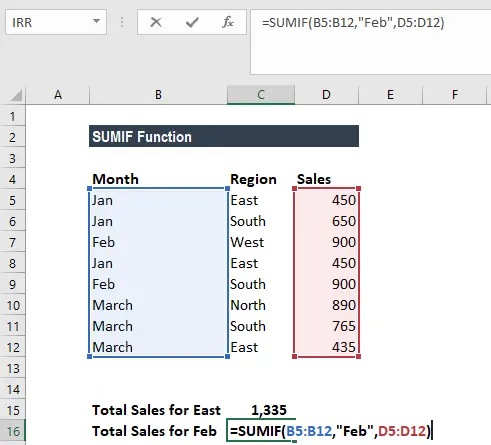
SUMIF
By using this function, you can sum values under your own conditions. This is a very helpful function when you have to find the sum of specific entities in a large amount of data. The basic function to use in Excel is: =SUMIF(range, condition, sum_range). See this picture for a better understanding:
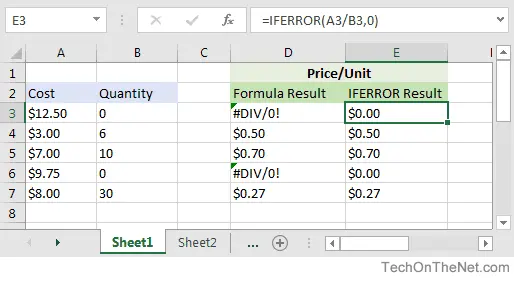
IFERROR
This function helps uniformly deal with the errors that take place during Excel’s calculations. These errors can happen when the calculation conditions are invalid. For example, when you divide something by 0, Excel may give the output as: #DIV/0!
Through this function, you can replace the error with the value you want. The basic formula to use: =IFERROR(formula, value_if_error)
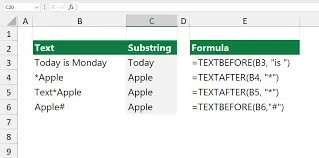
TEXTBEFORE / TEXTAFTER
These help you cut text before or after a specific delimiter. You can think of these functions like a pair of scissors for text.
- =TEXTBEFORE(text, symbol) → gives text before a certain word or symbol
- =TEXTAFTER(text, symbol) → gives text after a certain word or symbol
See the example in this picture to understand these formulas:
LET
This function allows you to give short names to specific values so that you don’t have to type their full form again and again while using them in calculations or other formulas. Basic input for this function is: =LET(name, value, calculation). To understand the LET function in more detail, you can explore the linked guide.

Extract Data From Images Directly
In many everyday working situations, professionals receive data in the form of images. It’s not possible to copy text when it’s in the image format. Manually typing data from an image consumes a lot of time while also leaving the data entry vulnerable to errors.
Excel allows text extraction from an image directly through its “Data From Picture” feature. This option makes data entry from images quick and accurate. Let’s understand this feature practically.
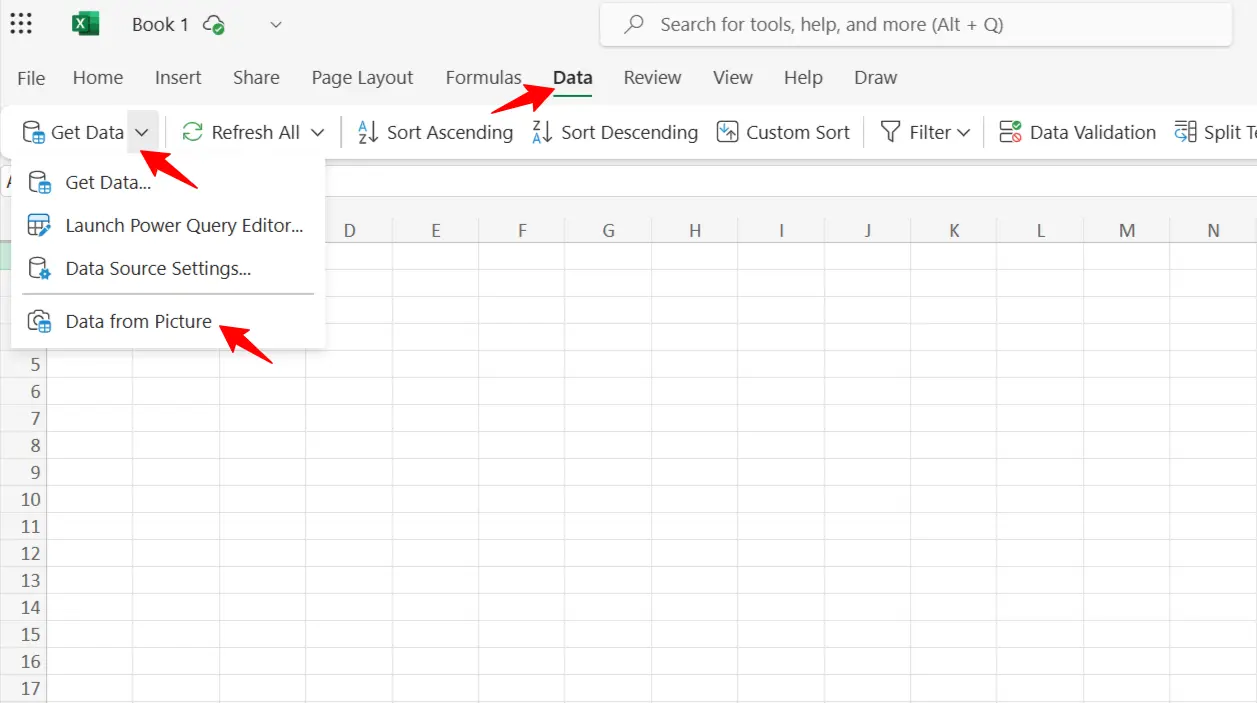
After opening an Excel spreadsheet, go to Data → Get Data → Data from Picture, as shown in the screenshot:
Now, select the image that you want to upload. Excel will analyze it and show a preview of the image data. Now, you can either add the exact data that Microsoft Excel has extracted by clicking on the “Insert” button. Or you can click on the “Review” button to check and edit it yourself before inserting it into the sheet. It reduces the chances of accidental mistakes.
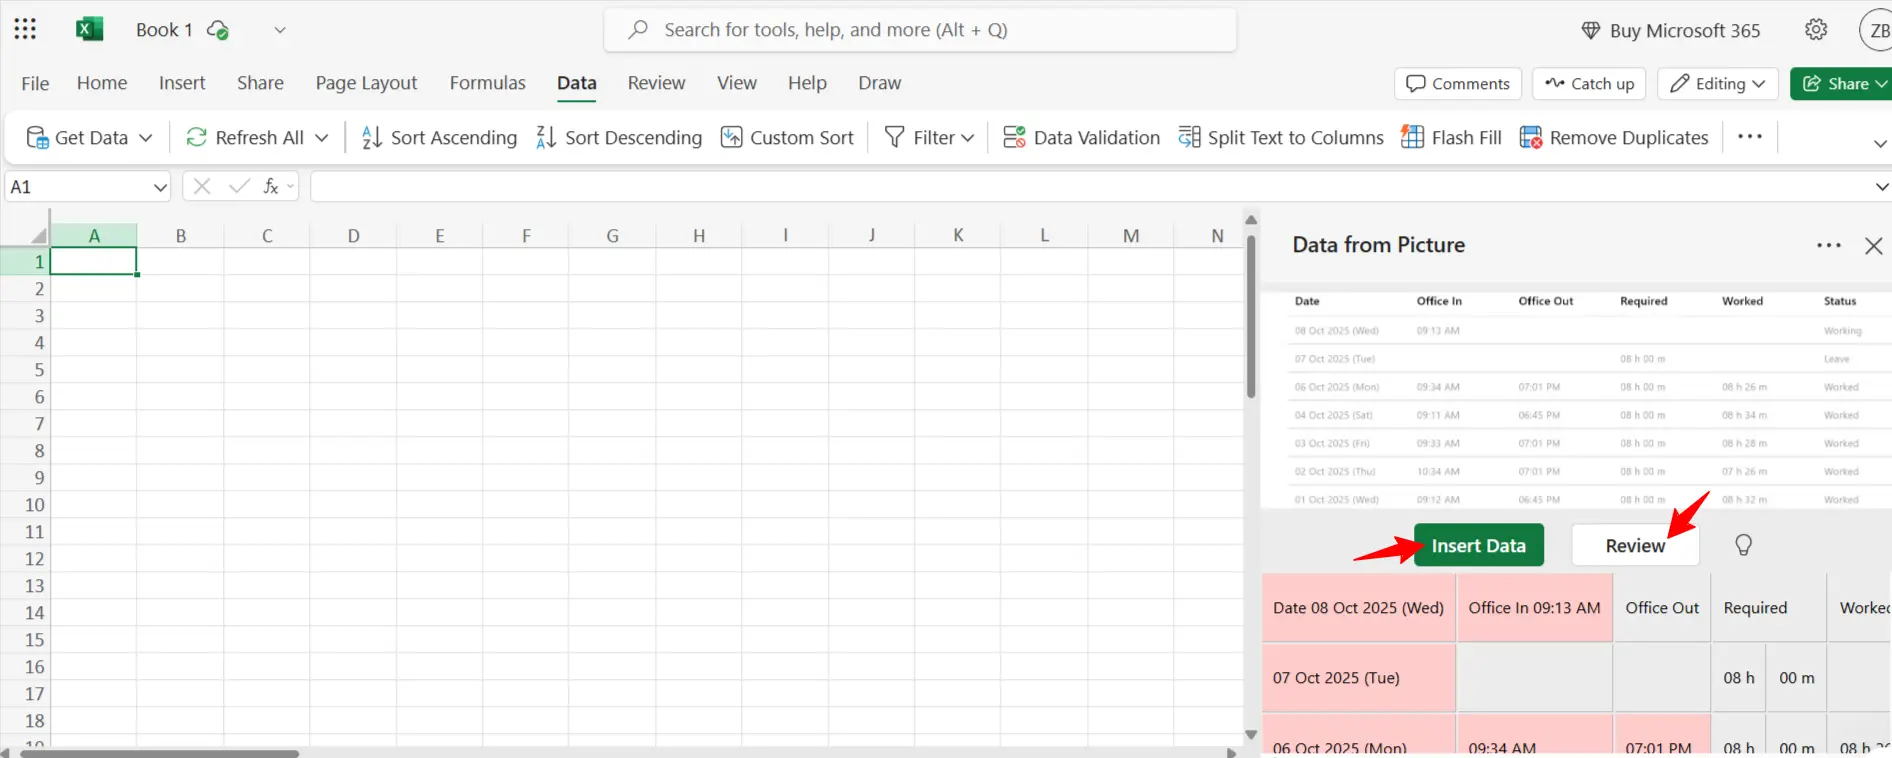
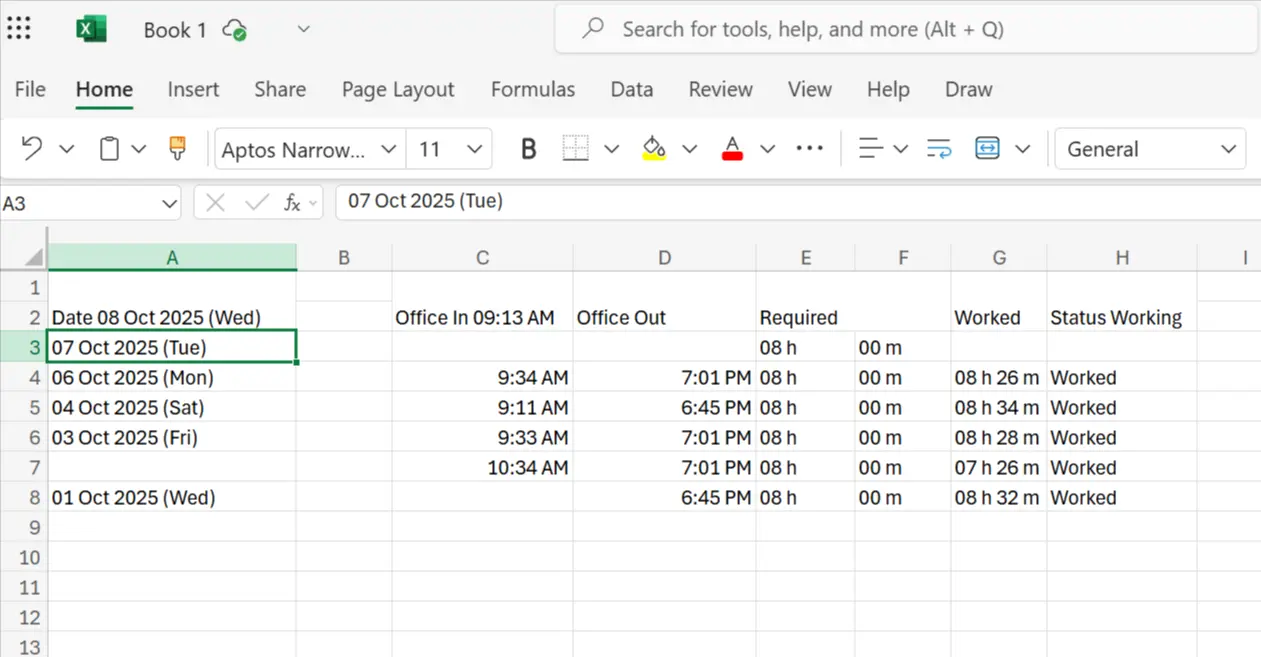
Once you’re all set, press the “Insert” button, and your image text will appear right there in your Excel cells, like this:
It’s a handy way of speeding up data entry in Excel for image-based information. However, there’s a limitation. This feature may not be available in desktop versions up to Excel 2021. To access it, you might need an active Excel subscription.
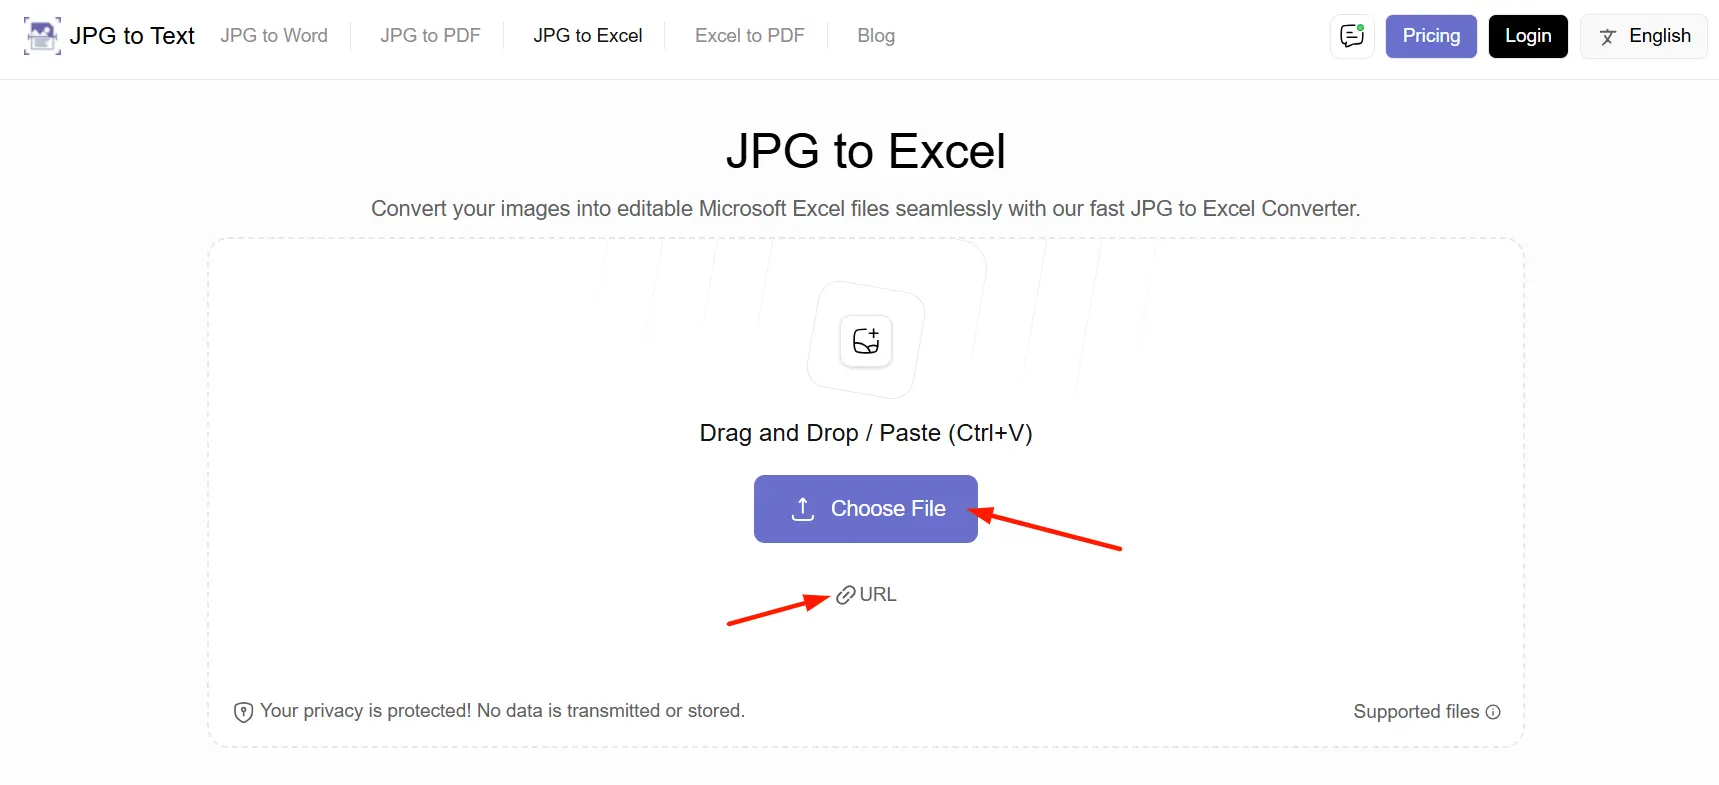
In such cases, you can use dedicated online tools. They are easy to use and can perform image-to-Excel conversions quickly and accurately. Let’s understand this through an example involving the use of an Image to Excel converter.
After accessing the tool, simply click on “Choose File” to upload the picture. If you don’t have the image saved, then you can provide the image URL as well. The tool is capable of working with both options.
Drag and drop option is also available. You can upload the image in multiple formats, including JPG, PNG, JFIF, WEBP, BMP, JPEG, and HEIC.
After uploading the image, simply click on the “Convert Now” button.
The tool quickly processes your image with the help of OCR (Optical Character Recognition) technology, and provides you with the extracted text in the form of an Excel file. Now, you can edit, copy, or download this Excel file according to your needs.
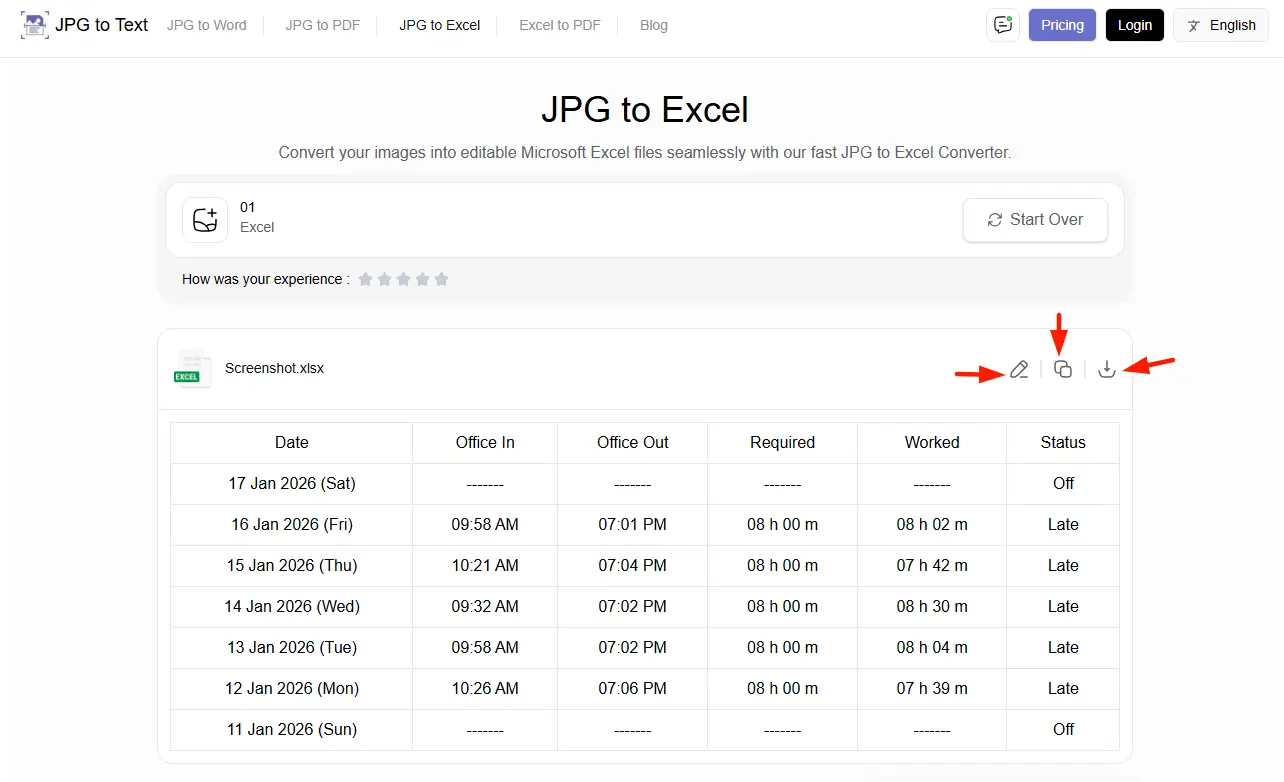
Both of these methods are efficient for data entry and processing in Excel for image-based data. You can use either of these two ways, depending on the version of Excel you currently have.
Few insightful articles on Excel to improve your knowledge:
Final Tips
Keeping your data clean and structured right from the start can also help you maintain speed in data entry and processing in Excel. Avoid using unnecessary formatting and reuse templates whenever possible.
Try the smart methods listed above. Using them consistently can lead to small improvements. With time, these improvements compound into faster workflows and more reliable data processing.

- Get Hired Quickly: Top Tally Classes Online for High-Paying Jobs - July 10, 2026
- Accounting Courses Online with Certificate: Your 2026 Career Launchpad - July 3, 2026
- SAP FICO Career Guide for Freshers: How to Land Your First Job - June 26, 2026